For backyard chicken owners in the United States, coop cleaning matters in every season. Summer heat can make odors and flies worse. Winter moisture can create damp bedding and ammonia problems. Rainy weather can turn a run into mud. A dirty coop may also attract rodents, create moldy bedding, and make nesting boxes unpleasant for egg laying hens.
The good news is that chicken coop cleaning does not have to be complicated. With a simple schedule, the right supplies, and a practical step-by-step routine, even beginners can keep a backyard flock in much better condition without spending all day cleaning.
Quick Answer Box
The best way to clean a chicken coop is to remove chickens safely, take out feeders and waterers, remove old bedding and droppings, scrape roosts and nesting boxes, sweep dust and feathers, wash dirty surfaces, disinfect only when needed, let everything dry completely, then add fresh bedding. For most backyard flocks, use daily spot cleaning, weekly nesting box and roost cleaning, and a deeper monthly or seasonal clean. Keep the coop dry, ventilated, and free of spilled feed to reduce odor, flies, rodents, and moisture problems.
Table of Contents
- Why Cleaning a Chicken Coop Matters for Chicken Health
- How Often Should You Clean a Chicken Coop?
- Daily, Weekly, Monthly, and Seasonal Chicken Coop Cleaning Schedule
- Signs Your Chicken Coop Needs Cleaning
- Chicken Coop Cleaning Supplies and Tools You Need
- How to Safely Move Chickens Before Cleaning
- Step-by-Step Guide to Cleaning a Chicken Coop
- How to Clean Chicken Nesting Boxes
- How to Clean Chicken Roosting Bars
- How to Clean Chicken Coop Floors and the Chicken Run
- How to Clean a Wooden or Small Backyard Chicken Coop
- Best Bedding for Easy Chicken Coop Cleaning
- How to Clean a Chicken Coop Using the Deep Litter Method
- How to Remove Ammonia Smell and Keep the Coop from Smelling Bad
- How to Prevent Mold and Moisture in the Coop
- How to Keep Flies and Rodents Away During Coop Cleaning
- How to Clean a Coop After Mites, Lice, or Illness
- Vinegar, Bleach, and Safe Disinfectants for Chicken Coops
- Natural Chicken Coop Cleaning Options
- How to Clean a Chicken Coop in Winter, Summer, and Rainy Weather
- How to Store Chicken Feed and Bedding Safely
- Chicken Coop Maintenance Tips for Beginners
- Chicken Coop Cleaning Mistakes to Avoid
- My Practical Recommendation
- FAQs About Cleaning a Chicken Coop
- Final Chicken Coop Cleaning Checklist
- Conclusion
Why Cleaning a Chicken Coop Matters for Chicken Health
Cleaning a chicken coop is one of the simplest ways to support chicken health. Hens spend many hours inside the coop, especially at night. They roost there, lay eggs there, and walk through bedding every day. If droppings, wet bedding, and spilled feed build up, the coop can become smelly, damp, and uncomfortable.
A dirty coop can create several common backyard flock problems. Wet bedding can produce ammonia odor. Mold may grow where moisture sits too long. Flies may gather around damp droppings. Rodents may appear when feed is left open. Dirty nesting boxes can lead to dirty eggs and hens refusing to lay in the proper place.
Good coop hygiene does not mean using harsh chemicals every week. It means removing waste, keeping bedding dry, improving ventilation, protecting feed, and checking for problems before they get worse. Clean coops are easier to manage, more pleasant to visit, and better for long-term backyard chicken care.
How Often Should You Clean a Chicken Coop?
How often to clean a chicken coop depends on flock size, coop design, bedding type, weather, ventilation, and how much time your chickens spend inside. A small coop with six hens may need cleaning more often than a larger coop with excellent airflow and deep bedding. A wet climate may require more attention than a dry climate.
As a practical starting point, do quick spot cleaning daily or every few days, clean nesting boxes and roosting areas weekly, and do a deeper clean monthly or seasonally. If you smell ammonia, see wet bedding, notice flies, or find dirty eggs, do not wait for the calendar. Clean the problem area right away.
Beginners often ask for one perfect chicken coop cleaning schedule, but the best schedule is the one that responds to real coop conditions. Dry bedding, low odor, clean water, and comfortable hens are better signs than a fixed date.
Daily, Weekly, Monthly, and Seasonal Chicken Coop Cleaning Schedule
Daily Chicken Coop Cleaning Tasks
Daily chicken coop cleaning should be quick and realistic. Collect eggs, check waterers, look for wet bedding, remove obvious droppings near the entrance, and inspect the feeder area for spilled feed. If you use droppings boards under the roosting bars, scrape them daily or every other day. This one habit can greatly reduce odor and make weekly cleaning easier.
Weekly Chicken Coop Cleaning Tasks
A weekly chicken coop cleaning routine should include refreshing nesting boxes, scraping roosting bars, sweeping dusty corners, checking ventilation openings, and washing feeders and waterers. This is also a good time to look for early signs of mites, lice, rodents, leaks, or damaged hardware cloth.
Monthly Chicken Coop Deep Cleaning Routine
A monthly chicken coop cleaning routine is more detailed. Remove old bedding, scrape dried droppings, sweep walls and floors, wash dirty surfaces, and disinfect if there has been illness, pests, or heavy contamination. Let the coop dry completely before adding fresh bedding. This helps prevent trapped moisture and mold.
Seasonal Chicken Coop Cleaning Checklist
Seasonal cleaning is a full reset and inspection. In spring, remove old winter bedding and check for moisture damage. In summer, focus on flies, odor, shade, and clean water. In fall, prepare for colder weather with dry bedding and secure ventilation. In winter, avoid soaking the coop unless it can dry fully before night.
| Schedule | Main Tasks | Why It Matters | Beginner Tip |
|---|---|---|---|
| Daily | Collect eggs, check water, remove wet spots | Keeps eggs cleaner and prevents odors | Focus under roosts first |
| Weekly | Refresh nesting boxes, scrape roosts, clean feeders | Controls droppings, pests, and dirty bedding | Pick the same day each week |
| Monthly | Remove bedding, wash dirty surfaces, inspect coop | Prevents buildup and hidden problems | Choose a dry sunny day |
| Seasonal | Deep clean, repair, prepare for weather changes | Supports long-term coop maintenance | Check roof, run drainage, and ventilation |
Signs Your Chicken Coop Needs Cleaning
Your coop will usually tell you when it needs attention. The first sign is often smell. A normal chicken coop may smell earthy or dusty, but it should not smell sharp, sour, or overwhelming. If ammonia odor hits your nose when you open the door, bedding and droppings need attention right away.
Other warning signs include wet bedding, dirty eggs, flies around corners, droppings caked on roosts, moldy bedding, damp nesting boxes, feathers stuck in manure, and chickens avoiding certain areas. If hens seem restless at night, check roosts and cracks for mites or lice.
Also pay attention to the chicken run. A clean coop attached to a muddy, smelly run can still cause dirty feet, dirty eggs, and pest problems. Coop cleaning and run maintenance should work together.
| Symptom | Possible Cause | Action |
|---|---|---|
| Strong ammonia smell | Wet bedding and droppings buildup | Remove wet bedding, improve airflow, add dry bedding |
| Dirty eggs | Soiled nesting boxes or muddy run | Refresh nest bedding and improve run drainage |
| Flies around the coop | Damp manure, spilled feed, poor airflow | Spot clean, dry bedding, secure feed |
| Moldy bedding | Leaks, humidity, poor ventilation | Remove moldy material and fix moisture source |
| Rodent droppings or chewing | Open feed or gaps in coop | Store feed securely and seal entry points |
Chicken Coop Cleaning Supplies and Tools You Need
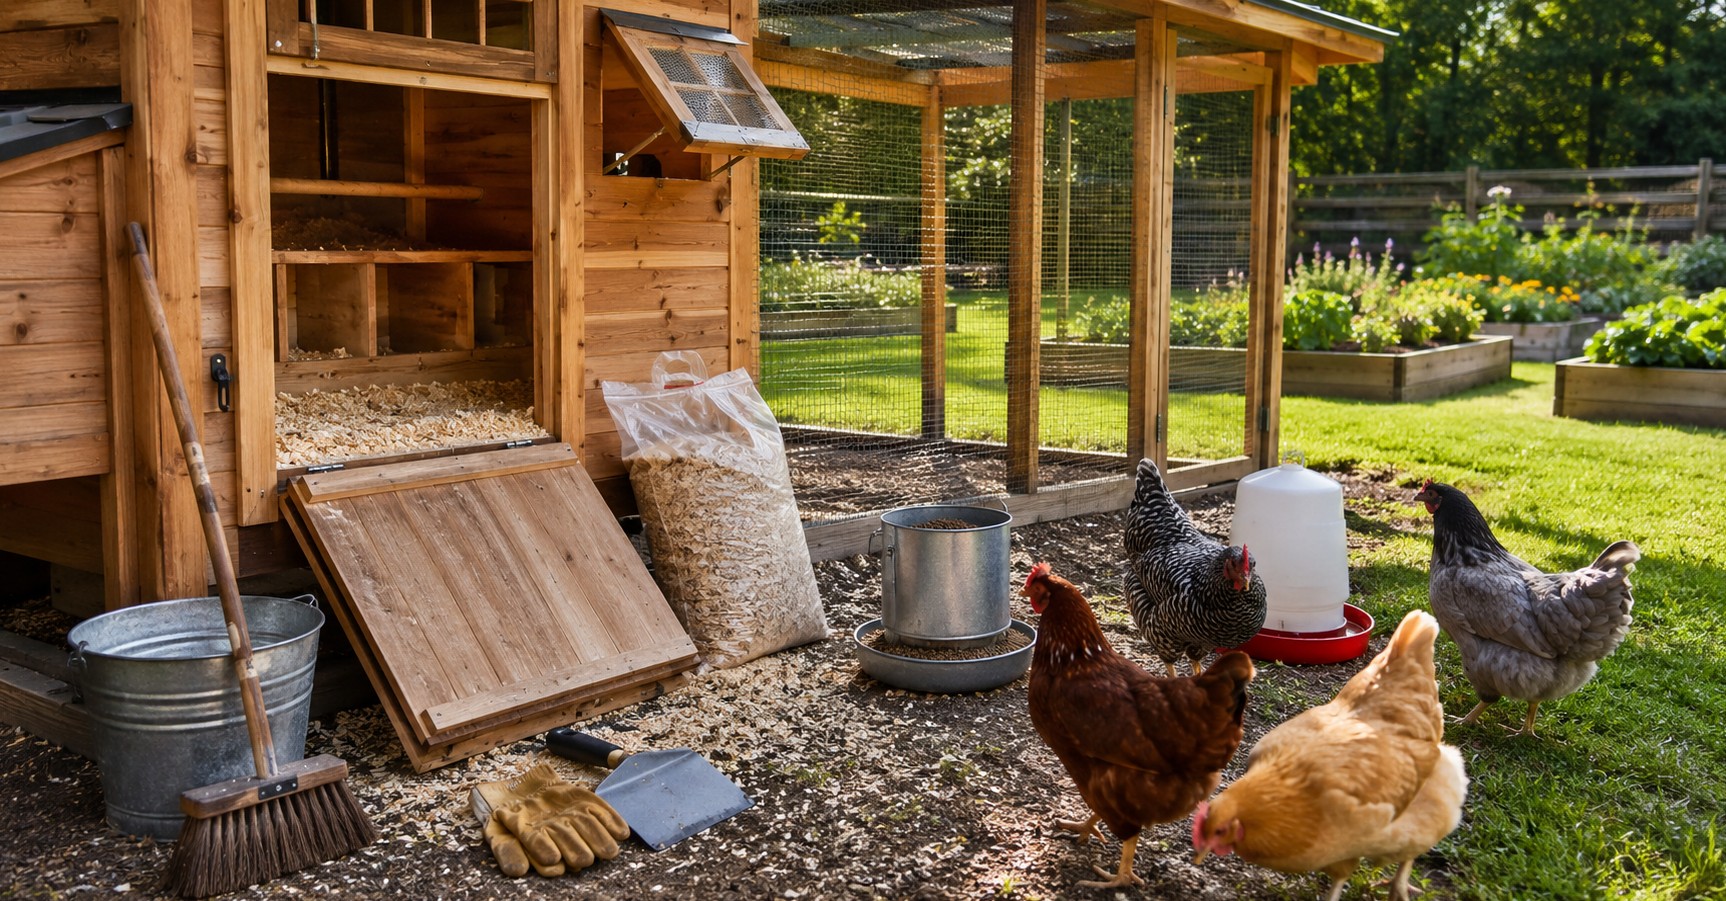
The best chicken coop cleaning supplies are simple, sturdy, and easy to rinse. You do not need expensive equipment to clean a backyard chicken coop. Most owners can handle the job with gloves, a scraper, a broom, a dustpan, a rake, a shovel, a bucket, a hose, mild soap, fresh bedding, and a safe disinfectant when needed.
Useful chicken coop cleaning tools include a putty knife for dried droppings, a stiff brush for roosting bars, a small shovel for old bedding, a wheelbarrow for moving waste, and a rake for the run. A dust mask is helpful when sweeping dry bedding because chicken coop dust can irritate your nose and throat.
For cleaning products, mild soap and warm water are enough for many routine jobs. A labeled poultry-safe disinfectant is useful after illness, parasites, or heavy contamination. Always follow product directions, never mix cleaners, and keep chickens away until surfaces are dry and fumes are gone.
How to Safely Move Chickens Before Cleaning
Before deep cleaning, move your chickens to a safe temporary area. This may be a secure run, fenced yard, chicken tractor, garage pen, or separate holding space. Make sure they have water, shade, and protection from predators. Do not leave chickens loose near dogs, open gates, traffic, or cleaning products.
If you are cleaning a small chicken coop, you may only need to close the chickens in the run for a short time. If the run also needs cleaning, move the flock somewhere else first. Handle hens calmly and avoid chasing them around the yard. Stress can make birds harder to manage and may interrupt egg laying for sensitive hens.
Keep young children away from strong cleaners, dusty bedding, and sharp tools. If family members help, give them simple jobs like collecting loose items, carrying clean bedding, or refilling waterers after the coop is dry.
Step-by-Step Guide to Cleaning a Chicken Coop
Step 1: Remove Feeders, Waterers, and Loose Items
Take out feeders, waterers, egg baskets, removable nest pads, grit containers, and loose accessories. This gives you more room to work and keeps clean items from getting covered in dust. Empty old water, discard wet feed, and set everything aside for washing.
Step 2: Remove Old Bedding and Chicken Droppings
Use a shovel, rake, or gloved hands to remove old bedding and droppings. The heaviest buildup is usually under roosting bars. If you are wondering how to clean chicken poop from coop floors, scrape thick droppings first, then sweep, then wash only where needed. Dry waste is usually easier to remove than wet, packed waste.
Step 3: Scrape Roosting Bars, Floors, and Nesting Boxes
Scrape roosts, ledges, nesting box edges, and floor corners. A putty knife or paint scraper works well for dried droppings. Be gentle with wood so you do not create deep grooves where moisture and pests can hide.
Step 4: Sweep Dust, Feathers, and Debris
Sweep the floor, walls, corners, window ledges, and ventilation openings. Chicken dust can build up quickly, especially in dry bedding systems. Wear a mask if the coop is dusty. Good ventilation helps reduce moisture and odors, but avoid creating cold drafts directly on roosting birds in winter.
Step 5: Wash the Coop Interior
Wash dirty areas with warm water and mild soap. You do not always need to soak the entire coop. Focus on sticky droppings, dirty nesting boxes, feeder areas, and floor spots. For a wooden chicken coop, avoid over-wetting the wood because trapped moisture can lead to mold or rot.
Step 6: Disinfect the Chicken Coop Safely
If you need to disinfect, clean first and disinfect second. Disinfectants do not work well through layers of manure, bedding, and dirt. Use a safe disinfectant for chicken coop surfaces and follow the label. Keep birds out during use, ventilate the coop, and allow enough drying time.
Step 7: Let the Coop Dry Completely
Drying is one of the most important steps. Fresh bedding placed on damp wood or wet flooring can trap moisture and create odor. Open doors, windows, and vents when weather allows. A sunny breezy day is ideal for how to deep clean a chicken coop.
Step 8: Add Fresh Bedding
Add fresh bedding only after surfaces are dry. Pine shavings, straw, hemp, and sand can all work depending on your coop design. Spread bedding evenly and add extra comfort in nesting boxes. Avoid bedding that smells musty or has visible mold.
Step 9: Clean and Refill Feeders and Waterers
Wash feeders and waterers before returning them. Remove old feed dust, algae, bedding pieces, and slimy buildup. Refill with clean water and fresh feed. Clean waterers are especially important during hot US summers when chickens drink more often.
How to Clean Chicken Nesting Boxes
Nesting boxes should be clean, dry, and comfortable. Dirty nesting boxes can lead to dirty eggs, broken eggs, and hens choosing odd places to lay. Remove old nesting material, droppings, broken eggs, and feathers. Scrape any stuck mess, wipe the box if needed, let it dry, then add fresh bedding.
If hens sleep in nesting boxes, they will make the boxes dirty quickly. Chickens naturally poop while they sleep, so encourage them to sleep on roosting bars instead. Make sure roosts are higher than nesting boxes and comfortable for your flock. In some cases, you may need to block nesting boxes in the evening and open them again in the morning.
How to Clean Chicken Roosting Bars
Roosting bars are one of the dirtiest parts of a coop because chickens spend the night there. Scrape droppings from the top and sides of the bars. A smooth wooden roost is easier to clean than rough lumber with cracks. If roosts are removable, take them outside for a more thorough cleaning during deep clean days.
While cleaning roosts, inspect the underside and joints for mites. Mites often hide in cracks during the day and bother chickens at night. If you notice tiny crawling pests, pale combs, restless birds, or hens refusing to roost, investigate further and seek proper poultry care guidance.
How to Clean Chicken Coop Floors and the Chicken Run
To clean chicken coop floors, remove bedding first, scrape stuck droppings, sweep loose debris, and wash only where needed. Dirt floors, wood floors, painted floors, and removable trays all need slightly different care. The main goal is to keep the floor dry and prevent manure from packing into corners.
Chicken runs need regular care too. Rake droppings, remove spoiled vegetables, clean up spilled feed, and improve muddy areas with dry material such as coarse wood chips or properly managed sand. A wet run can make the coop dirty again because hens track mud into nesting boxes and onto eggs.
If your run stays wet after every rain, cleaning alone will not solve the problem. Improve drainage, add a roof section, redirect runoff, or build up low spots. A dry run helps with odor control, fly prevention, and overall backyard chicken coop maintenance.
How to Clean a Wooden or Small Backyard Chicken Coop
Wooden coops are common and attractive, but they need careful cleaning. Wood can absorb moisture, so avoid soaking it more than necessary. Scrape first, wash dirty areas, and let the coop dry fully. Check corners, seams, and roost supports because these spots can hold pests and moisture.
Small coops get dirty faster because there is less space for droppings, dust, and bedding to spread out. If you need to know how to clean a small chicken coop, focus on frequent light cleaning. Removable trays, droppings boards, and easy-access doors make a big difference. A small coop should not be overcrowded, because too many birds in a tight space create odor and moisture problems quickly.
Best Bedding for Easy Chicken Coop Cleaning
Bedding choice affects cleaning time, odor, moisture, and comfort. The best bedding for easy coop cleaning is dry, absorbent, affordable, and suitable for your climate. Pine shavings are a popular beginner-friendly choice. Straw is traditional and warm but can mat down if wet. Sand can be easy to scoop in covered dry areas, but it is heavy and not right for every setup.
Avoid cedar shavings because strong aromatic oils may irritate chickens. Also avoid moldy straw, wet bedding bags, or dusty material that makes the coop unpleasant. Whatever bedding you choose, the key is to keep it dry and replace it before it becomes packed with droppings.
| Material | Best Use | Pros | Cons |
|---|---|---|---|
| Pine shavings | General coop bedding | Absorbent, easy to find, simple to remove | Can be dusty depending on brand |
| Straw | Nesting boxes and some cold-weather setups | Warm, affordable, traditional | Can mat, hold moisture, and hide pests |
| Sand | Covered runs or dry coop floors | Easy to scoop when dry, drains well with proper base | Heavy and not ideal for wet coops |
| Hemp bedding | Premium bedding option | Absorbent and often lower dust | More expensive and not always local |
How to Clean a Chicken Coop Using the Deep Litter Method
The deep litter method chicken coop cleaning approach uses layers of bedding to manage droppings over time. Instead of removing all bedding every week, you add dry carbon material, turn the litter, and let the lower layers slowly break down. When managed correctly, it can reduce cleaning labor and create compost-like material.
Deep litter is not the same as neglect. It should not smell strongly of ammonia, feel soggy, or become packed into a wet mat. Add dry bedding when droppings increase, turn the litter to keep it loose, and remove wet areas quickly. Good ventilation is essential.
This method works best in coops with enough floor space and dry conditions. If your coop leaks, has poor airflow, or smells bad, fix those problems before relying on deep litter.
How to Remove Ammonia Smell and Keep the Coop from Smelling Bad
If you want to know how to remove ammonia smell from chicken coop bedding, start with moisture. Ammonia smell usually means droppings and wet bedding are breaking down in a poorly ventilated area. Remove wet bedding, scrape droppings, improve airflow, and add clean dry bedding.
Do not simply cover odor with herbs, powders, or fresh bedding. Those may make the coop smell better for a short time, but they do not solve the cause. If ammonia makes your eyes water, it is too strong. Your chickens are much closer to the bedding than you are, so take odor seriously.
To keep a chicken coop from smelling, prevent water spills, avoid overcrowding, use absorbent bedding, clean under roosts often, and make sure the coop has ventilation near the top. Good airflow removes moisture without needing a cold draft across sleeping hens.
How to Prevent Mold and Moisture in the Coop
Moisture is one of the biggest enemies of a healthy coop. It can come from roof leaks, poor drainage, waterer spills, humid weather, overcrowding, or blocked ventilation. Once bedding stays wet, odor, mold, flies, and ammonia can follow.
To prevent mold in chicken coop bedding, keep bedding dry, fix leaks quickly, raise waterers if birds keep spilling them, and open ventilation areas that remove humid air. Check corners and walls after rain. If you find moldy bedding, remove it instead of mixing it into fresh bedding.
Good coop ventilation matters all year. In winter, some beginners close vents to keep chickens warm, but trapped moisture can become a bigger problem than cold air. The goal is ventilation without direct drafts on roosting birds.
How to Keep Flies and Rodents Away During Coop Cleaning
Flies love wet droppings, spilled feed, and dirty corners. The best way to keep flies out of a chicken coop is to keep manure dry, remove wet bedding, clean under roosts, and avoid leaving spoiled food in the run. During summer, clean waterers and feeder areas more often.
Rodents are usually attracted by feed. Store chicken feed in sealed metal or heavy-duty containers, clean spills quickly, and avoid keeping open feed bags in the coop. During cleaning, look for chewing marks, tunnels, droppings, or gaps around doors and corners.
Use hardware cloth on vulnerable openings and check that doors close tightly. Basic chicken wire may keep chickens in, but it is not always enough to keep rodents and predators out. Cleanliness, feed storage, and secure construction work together.
How to Clean a Coop After Mites, Lice, or Illness
Cleaning after mites or lice requires extra attention. Remove bedding, scrape roosts, clean cracks, empty nesting boxes, and focus on hidden areas where pests may live. Parasites can hide in wood joints, roost supports, and corners. The birds may also need treatment, so do not clean only the coop and ignore the flock.
If you need to sanitize a chicken coop after illness, remove all organic material first. Wash surfaces, then use an appropriate disinfectant according to the label. Keep chickens out until the coop is dry and safe. If you see serious symptoms, sudden deaths, breathing problems, or fast-spreading illness, contact a poultry vet or local extension office for guidance.
Before adding new chickens, clean the coop, refresh bedding, inspect for pests, and make sure feeders and waterers are clean. New birds should be introduced carefully to reduce stress and disease risk.
Vinegar, Bleach, and Safe Disinfectants for Chicken Coops
Many backyard chicken owners ask about vinegar for cleaning chicken coop surfaces. Vinegar can be useful for light cleaning and wiping some surfaces, but it should not be treated as a complete disinfectant for serious illness situations. It may help with routine cleaning, but it is not a replacement for proper sanitation when disease risk is involved.
Can you use bleach to clean a chicken coop? In some cases, diluted bleach may be used carefully, but it must never be mixed with vinegar, ammonia, or other cleaners. Chickens should be kept away during use, the coop should be ventilated, and surfaces should be dry before birds return. Because mistakes with bleach can be risky, many beginners prefer a labeled poultry-safe disinfectant with clear directions.
The best cleaner for chicken coop maintenance depends on the job. Mild soap and water are good for routine dirt. A safe disinfectant is better for illness concerns. Dry bedding and ventilation are best for long-term odor control.
Natural Chicken Coop Cleaning Options
If you prefer to clean a chicken coop without chemicals, focus on mechanical cleaning first. Remove droppings, replace wet bedding, scrape roosts, sweep dust, wash with mild soap and water, and dry the coop well. These steps solve many common coop problems without harsh products.
Natural chicken coop cleaning methods may include using warm water, mild soap, vinegar for light surface cleaning, sunlight for drying, and good ventilation. However, natural does not always mean strong enough for every situation. After illness, parasites, or contamination, a proper disinfectant may be needed.
Think of natural cleaning as a routine maintenance approach, not a cure-all. The most natural and effective long-term strategy is a dry, well-designed coop with proper bedding, clean water, secure feed storage, and enough space for the flock.
How to Clean a Chicken Coop in Winter, Summer, and Rainy Weather
How to Clean a Chicken Coop in Winter
Winter cleaning should focus on dryness. Avoid soaking the coop unless you have enough warmth and airflow for it to dry completely. Remove wet bedding, scrape roosts, refresh nesting boxes, and keep ventilation open near the top of the coop. Do not seal the coop so tightly that moisture builds up.
How to Clean a Chicken Coop in Summer
Summer cleaning should focus on flies, odor, and water quality. Heat can make smells stronger and waterers dirty faster. Clean under roosts more often, wash waterers regularly, and remove spoiled scraps from the run. Provide shade and fresh water while chickens wait during cleaning.
How to Clean a Chicken Coop in Rainy Weather
Rainy weather can make bedding and runs messy. If you need to dry out a wet chicken coop, remove soaked bedding first, fix leaks, improve drainage, and allow surfaces to dry before adding fresh bedding. Do not keep piling dry bedding over wet bedding without solving the moisture source.
How to Store Chicken Feed and Bedding Safely
Good cleaning habits include safe storage. Chicken feed should be stored in sealed containers that keep out rodents, moisture, and insects. Metal trash cans with tight lids are common on backyard homesteads. Heavy-duty plastic bins can work if rodents are not chewing through them.
Keep bedding dry and off wet ground. A bag of pine shavings or straw that gets damp can grow mold before you use it. Do not add musty bedding to the coop. It is better to discard questionable bedding than to risk moisture and mold around your flock.
Clean feed storage areas too. Spilled feed behind bins or under shelves can attract pests. A coop may be clean inside but still have rodent problems if feed is stored poorly nearby.
Chicken Coop Maintenance Tips for Beginners
Beginner chicken keepers should design cleaning into the coop setup. Wide doors, removable trays, droppings boards, easy-access nesting boxes, and washable feeders make cleaning much easier. If you are still building or choosing a coop, do not only think about how it looks. Think about how your hand, scraper, broom, and bedding bag will fit inside.
Keep a small cleaning kit near the coop with gloves, scraper, broom, dustpan, and a small bucket. When tools are easy to reach, you are more likely to do quick cleaning before problems build up.
Also check the coop while cleaning. Look for loose latches, predator gaps, rusty hardware, sharp edges, water leaks, and damaged wire. Cleaning time is also inspection time. This habit can prevent bigger backyard chicken problems later.
Chicken Coop Cleaning Mistakes to Avoid
One common mistake is waiting until the coop smells terrible before cleaning. By that point, bedding is often wet and packed, and the job becomes harder. Small regular cleaning tasks save time in the long run.
Another mistake is adding fresh bedding over wet bedding. This hides the issue but does not fix it. Remove wet material first. Also avoid using strong chemical cleaners without reading directions, ventilating the coop, and keeping birds away.
Do not ignore the chicken run, feed storage, or waterer spills. Many coop odor and pest problems start outside the sleeping area. Finally, avoid overcrowding. Too many chickens in a small coop create more droppings, more moisture, and more cleaning than the setup can handle.
My Practical Recommendation
For most backyard chicken owners, I recommend a simple routine: scrape droppings boards daily or every few days, refresh nesting boxes weekly, clean feeders and waterers weekly, and do a deeper bedding clean monthly or when conditions require it. Use absorbent bedding such as pine shavings if you want a beginner-friendly option, and keep the coop dry before worrying about special products.
If the coop smells, solve moisture and manure buildup first. If there are flies, remove wet waste and spilled feed. If there are rodents, secure the feed and close entry points. If there are mites, lice, or illness concerns, clean thoroughly and get reliable poultry health advice. The best way to clean a chicken coop is not one huge yearly cleanup. It is a steady habit that keeps small problems from turning into expensive or stressful ones.
FAQs About Cleaning a Chicken Coop
How often should I clean a chicken coop?
Most backyard chicken owners should do quick spot cleaning daily or every few days, weekly refreshes, and a deeper clean monthly or seasonally. The exact timing depends on flock size, coop size, bedding type, weather, and ventilation. If bedding is wet, ammonia smell is strong, eggs are dirty, or flies are increasing, clean sooner. A flexible chicken coop cleaning schedule works better than waiting for a fixed date while problems build up.
What is the best way to clean a chicken coop for beginners?
The best beginner method is to keep the process simple and repeatable. Move chickens safely, remove loose items, take out old bedding, scrape droppings, sweep dust, wash dirty surfaces, dry the coop, and add fresh bedding. Beginners should focus on dry bedding, clean water, good ventilation, and regular spot cleaning. You do not need harsh chemicals for every cleaning day, but you should use a proper disinfectant when illness or parasite concerns require it.
How do I clean chicken poop from a coop floor?
Start by removing loose bedding so you can see the floor. Use a scraper or putty knife to loosen dried droppings, then sweep or shovel the waste out. If droppings are stuck, dampen the spot lightly and scrape again. Avoid soaking wooden floors unless they can dry fully. For easier future cleaning, consider using droppings boards under roosts or removable floor trays if your coop design allows it.
Can I use vinegar to clean a chicken coop?
Vinegar can be used for light routine cleaning on some coop surfaces, especially when you are wiping down areas that are not heavily contaminated. However, vinegar is not the right solution for every problem. It should not be relied on as the main disinfectant after illness, parasites, or serious contamination. Never mix vinegar with bleach or other cleaners. Keep chickens away while cleaning and let surfaces dry before adding bedding.
Can you use bleach to clean a chicken coop?
Bleach can be used in some sanitation situations if it is properly diluted and handled carefully, but it must never be mixed with vinegar, ammonia, or other cleaning products. Chickens should be removed from the area, the coop should be well ventilated, and surfaces should be dry before birds return. If you are not comfortable using bleach, choose a labeled poultry-safe disinfectant and follow its directions closely.
How do I remove ammonia smell from a chicken coop?
Remove wet bedding and manure first. Ammonia smell usually comes from moisture and droppings breaking down in a poorly ventilated area. Scrape under roosts, replace wet bedding, improve airflow, and prevent waterer spills. Do not just cover the smell with herbs or fresh shavings. If the odor is strong enough to bother your nose or eyes, the coop needs immediate cleaning and better moisture control.
How do I clean chicken nesting boxes?
Remove old nesting material, broken eggs, feathers, and droppings. Scrape or wipe the box if needed, let it dry, and add fresh bedding. Nesting boxes should be checked often because dirty boxes lead to dirty eggs. If hens are sleeping in the boxes, adjust roost placement or block nest access at night so they learn to sleep on roosts instead of in the laying area.
How do I clean a chicken run?
Rake droppings, remove spoiled food, clean up spilled feed, and replace muddy or wet areas with dry material. If the run stays wet, improve drainage or add a covered section. A dirty run can quickly make the coop dirty because hens track mud and manure into nesting boxes. Run cleaning is especially important during rainy weather and summer heat when odor and flies can increase quickly.
How do I clean a chicken coop after mites or lice?
Remove all bedding, scrape roosts, clean nesting boxes, and focus on cracks where pests may hide. Parasites can live in the coop environment as well as on birds, so the flock may need proper treatment too. Follow guidance from a poultry vet, extension office, or trusted poultry health source. Do not return birds to a dirty or untreated environment if mites or lice are still active.
How do I clean a chicken coop in winter?
In winter, avoid soaking the coop unless it can dry completely before temperatures drop. Focus on removing wet bedding, scraping roosts, cleaning nesting boxes, and keeping ventilation open without creating direct drafts on sleeping chickens. Add dry bedding more often if birds spend more time indoors. Moisture control is very important during cold weather because damp bedding and poor airflow can lead to ammonia odor.
How do I keep rodents out of a chicken coop?
Rodent prevention starts with feed storage. Keep feed in sealed containers, clean spills quickly, and avoid leaving open feed bags in or near the coop. During cleaning, look for holes, chewing marks, droppings, and gaps around doors. Use hardware cloth where needed and keep clutter away from the coop. A clean coop is helpful, but secure feed and tight construction are just as important.
Should I disinfect my chicken coop every time I clean it?
No, routine cleaning does not always require disinfecting. For normal maintenance, removing manure, replacing bedding, washing dirty areas, and drying the coop may be enough. Disinfection is more important after illness, parasite problems, introducing new birds, or heavy contamination. Overusing strong cleaners can create unnecessary fumes and moisture. Clean first, disinfect only when needed, and always let the coop dry before chickens return.
Final Chicken Coop Cleaning Checklist
- Move chickens to a safe temporary area before deep cleaning.
- Remove feeders, waterers, loose items, and old bedding.
- Scrape roosting bars, nesting boxes, floors, and droppings boards.
- Sweep dust, feathers, feed waste, and debris.
- Wash dirty areas with mild soap and water when needed.
- Disinfect only when appropriate and follow product directions.
- Let the coop dry completely before adding bedding.
- Add clean, dry bedding to floors and nesting boxes.
- Clean and refill feeders and waterers.
- Check for leaks, pests, mold, odor, rodents, and ventilation problems.
Conclusion
Learning how to clean a chicken coop gives you more control over odor, moisture, pests, dirty eggs, and everyday backyard flock health. The process does not need to be complicated. Remove waste, keep bedding dry, clean roosts and nesting boxes, wash feeders and waterers, and use safe disinfectants only when the situation calls for it.
Start with a simple routine and adjust it to your coop, flock size, weather, and bedding type. If you notice serious illness signs, sudden deaths, heavy parasite problems, or symptoms that spread through the flock, contact a poultry vet or local extension office. For everyday chicken keeping, consistent small cleaning habits are the most reliable way to keep your coop healthier, easier to manage, and more comfortable for your hens.