
Quick Answer
Most backyard chicken coops need light daily cleaning, a more complete weekly cleaning, and a deeper clean every one to three months. Daily tasks include removing obvious droppings, checking water spills, collecting eggs, and refreshing dirty nest bedding. Weekly cleaning usually means replacing soiled bedding, scraping roost boards, and checking odor. Deep cleaning chicken coop surfaces is usually needed monthly or seasonally, depending on flock size, moisture, smell, and bedding buildup. If the coop smells strongly, feels damp, attracts flies, or eggs are coming out dirty, clean it sooner.
Table of Contents
- Why Chicken Coop Cleaning Frequency Matters
- The Ideal Chicken Coop Cleaning Schedule
- Daily Chicken Coop Cleaning Checklist
- Weekly Chicken Coop Cleaning Routine
- Monthly and Seasonal Deep Cleaning
- Signs Your Chicken Coop Needs Cleaning
- How Often to Change Chicken Coop Bedding
- Best Bedding for Easier Cleaning
- Chicken Coop Odor Control Tips
- How to Keep a Chicken Coop Clean and Dry
- Best Tools and Materials for Coop Cleaning
- Deep Cleaning a Chicken Coop Step by Step
- Common Chicken Coop Cleaning Mistakes
- Seasonal Chicken Coop Cleaning Tips
- My Practical Recommendation
- FAQ
- Final Checklist
- Conclusion
Why Chicken Coop Cleaning Frequency Matters
A chicken coop is a small living space that collects droppings, feathers, dust, spilled feed, bedding, moisture, and nesting material. Even a healthy backyard flock can make a coop messy quickly, especially if the hens sleep inside every night. Cleaning too rarely can lead to wet bedding, stronger ammonia odor, dirty eggs, more flies, and a coop that becomes harder to maintain over time.
Cleaning too aggressively can also be unnecessary. Many beginners think they need to wash the entire coop every few days. That can create more moisture than needed, especially in wood coops. The better approach is regular maintenance: remove the dirtiest material often, keep bedding dry, improve ventilation, and deep clean when buildup becomes a problem.
The right backyard chicken coop cleaning routine depends on several real-world factors:
- Flock size: More birds create more droppings and bedding wear.
- Coop size: A small coop gets dirty faster than a roomy coop.
- Ventilation: Poor airflow traps moisture and odor.
- Bedding type: Pine shavings, straw, sand, hemp, and deep litter all behave differently.
- Weather: Rainy, snowy, or humid weather makes coop maintenance more important.
- Run access: Chickens that spend more time outside usually keep the coop cleaner.
So, when someone asks how often should I clean my chicken coop, the best answer is: clean small messes daily, manage bedding weekly, and deep clean based on odor, moisture, and buildup.
The Ideal Chicken Coop Cleaning Schedule
A good chicken coop cleaning schedule should feel manageable. If it feels too complicated, it usually will not last. The easiest system is to divide chores into daily, weekly, monthly, and seasonal tasks. This prevents the coop from getting out of control and keeps deep cleaning from becoming a huge weekend project.
| Cleaning Frequency | What to Do | Why It Matters |
|---|---|---|
| Daily | Collect eggs, remove obvious droppings, check water spills, refresh dirty nest bedding | Keeps eggs cleaner, reduces odor, catches moisture early |
| Weekly | Scrape roost boards, stir or replace soiled bedding, clean feeders and waterers | Prevents buildup and improves daily coop comfort |
| Monthly | Remove heavy bedding buildup, inspect corners, check ventilation, clean nesting boxes | Controls odor, dust, and hidden damp areas |
| Seasonally | Deep clean, inspect structure, repair leaks, reset bedding, check predator protection | Prepares the coop for weather changes and long-term flock health |
This schedule is flexible. A dry coop with four hens may stay fresh with a weekly bedding refresh and a seasonal deep clean. A coop with ten hens in a rainy area may need bedding changed more often. The key is to inspect the coop with your eyes and nose, not just follow a calendar blindly.
Daily Chicken Coop Cleaning Checklist
Daily chicken coop cleaning does not need to be a long chore. In many backyard setups, it takes only a few minutes. The purpose is to catch the problems that make a coop dirty fast: droppings under roosts, broken eggs, wet bedding, spilled water, and feed waste.
Here is a practical daily chicken coop cleaning checklist:
- Collect eggs once or twice a day, especially in warm weather.
- Remove broken eggs or dirty nesting material right away.
- Check the area under roosting bars for heavy droppings.
- Look for wet bedding near waterers, doors, windows, or leaks.
- Refill clean water and remove bedding kicked into water dishes.
- Check feeders for moldy feed, clumps, or bedding contamination.
- Do a quick smell test near the coop door.
If you use droppings boards under the roosts, daily cleaning becomes much easier. Most nighttime droppings land there, so you can scrape them into a bucket instead of replacing all bedding. This is one of the simplest upgrades for backyard chicken coop cleaning.
Daily cleaning also helps you notice flock changes. If droppings look unusual, a hen is acting weak, or the coop suddenly smells worse than normal, you can respond sooner. For serious illness signs, contact a poultry vet or your local extension office for guidance.
Weekly Chicken Coop Cleaning Routine
A weekly chicken coop cleaning routine is where most of the real maintenance happens. This is the time to remove material that has started to build up, refresh bedding, wipe or rinse dirty equipment, and reset the coop before odor becomes a problem.
For many small backyard flocks, weekly cleaning should include:
- Scraping roost bars and droppings boards.
- Removing wet or compacted bedding.
- Adding fresh bedding to nesting boxes.
- Checking corners for dampness or hidden droppings.
- Cleaning waterers with a brush and mild soap.
- Removing spilled feed that can attract rodents.
- Checking doors, latches, vents, and hardware cloth.
This weekly reset is important because it prevents small messes from becoming deep cleaning problems. If bedding is dry and fluffy, you may only need to stir it and add a fresh layer. If bedding is wet, smells sour, or sticks together, remove it rather than covering it up.
Weekly coop maintenance is also a good time to check for predator entry points. Cleaning and safety go together. Gaps near floors, loose hardware cloth, weak latches, and feed spills can attract unwanted visitors. A clean coop is easier to inspect and easier to secure.
Monthly and Seasonal Deep Cleaning
How often should you deep clean a chicken coop? Many backyard coops benefit from a deep clean every one to three months, but the exact timing depends on how quickly the coop gets dirty. Deep cleaning chicken coop surfaces means removing old bedding, scraping buildup, cleaning nesting boxes, checking ventilation, and allowing the coop to dry before adding fresh bedding.
You may need monthly deep cleaning if:
- You have a larger flock in a smaller coop.
- Your climate is humid or rainy.
- Your coop has limited ventilation.
- Your hens spend a lot of time indoors.
- You notice odor returning quickly after weekly cleaning.
You may be able to deep clean seasonally if:
- Your coop stays dry.
- You use droppings boards consistently.
- Your flock has plenty of outdoor run space.
- Your bedding system is working well.
- There is no strong odor, dampness, or pest issue.
A deep clean is also smart before winter, after a long wet season, after treating a pest issue, or when introducing major coop changes. Avoid soaking a wooden coop right before cold or rainy weather unless it has enough time to dry fully.
Signs Your Chicken Coop Needs Cleaning
Your coop will usually tell you when it needs attention. A calendar helps, but signs inside the coop matter more. If something smells off, feels damp, or looks dirty, do not wait until the scheduled cleaning day.
| Sign | Likely Cause | Best Action |
|---|---|---|
| Strong ammonia smell | Too many droppings, poor ventilation, wet bedding | Remove soiled bedding, improve airflow, clean roost area |
| Wet bedding | Water spill, roof leak, poor drainage, rain blowing in | Remove wet bedding immediately and fix moisture source |
| Dirty eggs | Soiled nesting boxes or muddy hen feet | Refresh nesting material and improve run dryness |
| More flies than usual | Moist manure, spilled feed, broken eggs | Remove waste, clean spills, improve dryness |
| Bedding clumps together | Moisture and manure buildup | Remove compacted areas and add dry bedding |
| Hens avoid the coop | Odor, pests, heat, poor ventilation, stress | Inspect carefully, clean, and correct the cause |
If you notice coughing, swelling, weakness, sudden drop in egg laying, or multiple birds acting sick, cleaning alone may not solve the problem. Contact a poultry vet or local extension office for serious health concerns.
How Often to Change Chicken Coop Bedding
Many beginners ask how often to clean chicken coop bedding. In most backyard coops, bedding should be spot-cleaned daily or weekly and fully changed when it becomes damp, smelly, compacted, or heavily soiled. For some coops, that means a full change every week. For others, it may be every month or seasonally.
There is no one perfect number because bedding performance depends on moisture. Dry bedding can last longer. Wet bedding should be removed quickly. Covering wet bedding with fresh shavings may hide the problem for a day, but it does not fix the moisture underneath.
Use these practical guidelines:
- Nesting box bedding: Replace whenever dirty, broken eggs occur, or bedding becomes flattened.
- Floor bedding: Spot clean weekly and change fully when damp, smelly, or compacted.
- Deep litter method: Add dry carbon material regularly and manage carefully; remove if it smells bad or gets wet.
- Brooder or chick bedding: Change more often because chicks spill water and soil bedding quickly.
If you are asking how often should you change bedding in a chicken coop, a good beginner rule is to check bedding daily with your eyes, nose, and hands. It should look dry, smell mild, and feel loose. If it smells sharp, feels wet, or sticks together, remove it.
Best Bedding for Easier Cleaning
The best bedding for easier chicken coop cleaning is dry, absorbent, safe for chickens, and easy to remove. Bedding should help control moisture without creating too much dust. It should also work with your coop floor, climate, and cleaning routine.
| Material | Best Use | Pros | Cons |
|---|---|---|---|
| Pine shavings | General coop floors and nesting boxes | Absorbent, common, beginner-friendly, easy to remove | Can be dusty; must stay dry |
| Straw | Nesting boxes and dry coops | Comfortable, traditional, easy for hens to arrange | Can mat down and hide moisture |
| Sand | Dry climates and covered runs | Easy to scoop, drains well when managed properly | Heavy, not ideal in every climate, requires sifting |
| Hemp bedding | Coop floors and odor control | Absorbent, often lower dust, good moisture control | More expensive and not always locally available |
| Chopped leaves | Deep litter additions in dry conditions | Low cost, natural carbon source | Must be dry; can mold if wet |
Avoid cedar shavings because strong aromatic oils can be irritating for chickens. Also avoid moldy hay, damp leaves, and any bedding that has been exposed to chemicals or pesticides. For most beginners, pine shavings are the easiest starting point because they are available, absorbent, and simple to replace.
Chicken Coop Odor Control Tips
Chicken coop odor control starts with moisture control. A healthy coop should not smell like strong ammonia. A light earthy bedding smell is normal, but sharp odor means droppings and moisture are building up. The solution is usually not perfume, sprays, or heavy disinfectants. The solution is dry bedding, fresh air, and regular waste removal.
To keep a chicken coop clean and smell free:
- Use enough bedding to absorb moisture.
- Remove wet bedding immediately.
- Install or improve ventilation above roost height.
- Use droppings boards under roosts.
- Keep waterers from leaking or spilling inside the coop.
- Do not overcrowd the coop.
- Remove spilled feed before it attracts pests.
- Keep nesting boxes dry and clean.
If the coop smells bad the day after cleaning, look for the source. Common causes include poor airflow, a hidden leak, too many hens in too little space, damp bedding under the fresh layer, or droppings collecting under roosts. A clean coop for hens depends on solving the cause, not just masking the smell.
How to Keep a Chicken Coop Clean and Dry
Dryness is the foundation of chicken coop maintenance. A dry coop is easier to clean, smells better, and is more comfortable for hens. A wet coop can become dirty quickly even if you clean often.
Start with the roof and drainage. Rain should run away from the coop, not into the bedding. Check for leaks around roof edges, windows, doors, vents, and nesting box lids. In winter, watch for condensation on walls or windows. Condensation often means the coop needs better ventilation.
Next, look at water placement. Many coop moisture problems come from waterers. If possible, keep water in the run instead of inside the sleeping area, as long as birds have reliable access and the water does not freeze. If the waterer must be inside, raise it to reduce bedding contamination and check it daily.
Finally, manage mud around the coop. Hens with muddy feet can track dirt into nesting boxes and across bedding. Use covered run areas, wood chips, gravel paths, or dry outdoor bedding to reduce mud where chickens gather. Cleaner feet often mean cleaner eggs.
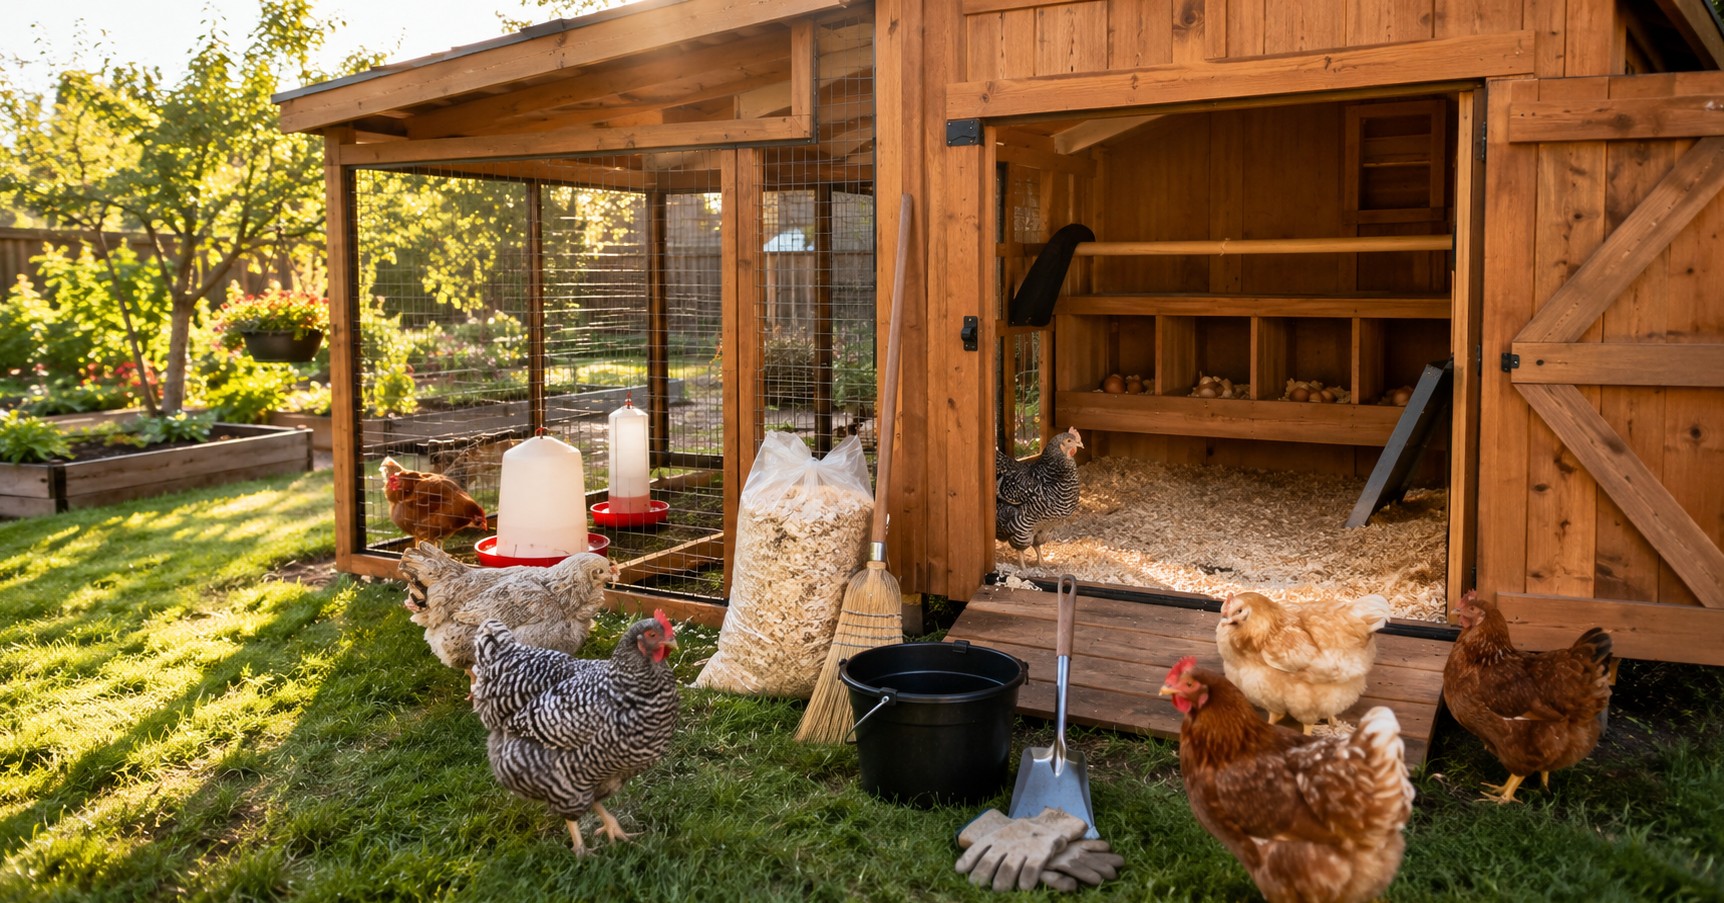
Best Tools and Materials for Coop Cleaning
You do not need expensive supplies for backyard chicken coop cleaning. A few dedicated tools make the job faster and cleaner. Keep coop tools separate from household tools, and store them where they are easy to grab.
| Tool or Material | Best Use | Practical Tip |
|---|---|---|
| Scraper or putty knife | Roost bars, droppings boards, dried buildup | Use before adding water; dry scraping is often easier |
| Stiff brush | Waterers, feeders, corners, textured surfaces | Keep one brush only for chicken equipment |
| Shovel or bedding fork | Removing floor bedding | Use a lightweight tool for small coops |
| Bucket or wheelbarrow | Moving used bedding | Plan where waste will go before you start |
| Gloves and mask | Personal protection | Helpful when cleaning dusty or dry bedding |
| Fresh bedding | Resetting the coop | Add only after the coop is dry |
For cleaning products, mild soap and water are often enough for feeders and waterers. Use stronger disinfectants only when needed, follow label directions, keep birds away during use, and allow surfaces to dry fully. Never mix cleaning chemicals.
Deep Cleaning a Chicken Coop Step by Step
The best way to clean a backyard chicken coop is to work in order. Deep cleaning goes faster when you remove birds first, take out bedding, dry scrape surfaces, wash only what needs washing, and let the coop dry before adding fresh material.
Step 1: Move chickens to a safe area
Before deep cleaning, make sure your flock has a secure temporary space with shade, water, and predator protection. Do not leave hens loose in an unsafe yard while you work.
Step 2: Remove feeders, waterers, and loose items
Take out removable items so you can clean around them. Empty old feed if it is damp, moldy, or contaminated with bedding. Wash waterers and let them dry before refilling.
Step 3: Remove old bedding
Shovel out bedding from the floor, nesting boxes, and corners. Pay special attention to damp areas near doors and under roosts. If bedding is moldy or very wet, handle it carefully and avoid breathing dust.
Step 4: Scrape roosts, boards, and corners
Dry scraping removes a lot of buildup without soaking the coop. Scrape roost bars, droppings boards, nest edges, and any flat surfaces where manure collects.
Step 5: Wash selected surfaces if needed
If surfaces are sticky or heavily soiled, wash with mild soap and water. Avoid turning the coop into a wet box unless you have warm weather and good drying time. Moisture left behind can create new problems.
Step 6: Inspect the coop structure
Look for loose boards, sharp edges, weak latches, damaged hardware cloth, gaps near the floor, roof leaks, and signs of rodents. Cleaning day is the perfect time to catch safety problems.
Step 7: Let everything dry
Do not rush this step. Fresh bedding placed on wet wood or damp flooring can trap moisture. Open doors and vents while the coop dries.
Step 8: Add fresh bedding and reset the coop
Add clean bedding to the floor and nesting boxes. Refill waterers and feeders. Make sure roosts are secure and the coop is ready before returning the flock.
Common Chicken Coop Cleaning Mistakes
Cleaning mistakes usually come from good intentions. Beginners often clean too little, clean too wet, or use products that are not necessary for routine coop maintenance.
Avoid these common mistakes:
- Ignoring moisture: Wet bedding is one of the biggest coop problems. Remove it quickly.
- Covering dirty bedding with clean bedding: This hides odor and moisture instead of solving it.
- Using strong scents to mask smell: Fragrances do not fix ammonia or damp bedding.
- Forgetting ventilation: A sealed coop traps moisture, especially in winter.
- Letting droppings build under roosts: This is usually the dirtiest area of the coop.
- Using unsafe bedding: Avoid moldy material, damp hay, and cedar shavings.
- Cleaning without checking for predators: Use cleaning time to inspect coop security.
- Putting birds back before the coop dries: Damp surfaces can make fresh bedding dirty quickly.
The best cleaning system is simple and repeatable. A few minutes each day and a weekly reset usually prevent the biggest problems.
Seasonal Chicken Coop Cleaning Tips
Seasonal chicken care changes the way you clean. A coop that works perfectly in spring may need a different routine in winter or during a humid summer.
Spring
Spring is a good time for a full reset after winter. Remove old bedding, check for moisture damage, clean nesting boxes, and inspect the run for mud. As egg laying increases, keep nest boxes fresh so eggs stay cleaner.
Summer
Summer cleaning focuses on odor, flies, and heat. Remove wet bedding quickly, keep feed spills cleaned up, and make sure the coop has airflow. Collect eggs often so they do not sit in hot nest boxes for long periods.
Fall
Fall is the time to prepare for cold weather. Deep clean before winter, repair leaks, improve predator protection, and make sure ventilation is working without creating strong drafts on roosting birds.
Winter
Winter cleaning is about balancing dryness and warmth. Do not close every vent. Chickens release moisture through breathing and droppings, and trapped moisture can cause problems. Remove wet bedding, manage condensation, and keep water spills under control.
My Practical Recommendation
For most beginner backyard chicken owners, I recommend a simple three-level system: daily spot checks, weekly bedding maintenance, and a deep clean every one to three months. This is realistic, easy to remember, and flexible enough for different flock sizes.
Start with pine shavings if you are unsure which bedding to use. Add droppings boards under roosts if your coop design allows it. Keep waterers from spilling inside the coop. Replace nesting box bedding whenever it looks dirty. If odor appears, do not wait for the weekend. Remove the wet or dirty material right away.
In practical terms, the answer to how often should you clean a chicken coop is this: clean lightly every day, clean intentionally every week, and deep clean whenever the coop stops staying dry and fresh. Your nose, the bedding condition, and your eggs will tell you a lot.
FAQ
How often should you clean a chicken coop?
Most backyard chicken coops should be checked daily, cleaned more thoroughly weekly, and deep cleaned every one to three months. Daily cleaning may only take a few minutes and includes collecting eggs, removing obvious droppings, and checking for wet bedding. Weekly cleaning usually includes scraping roost areas, refreshing bedding, and cleaning waterers. Deep cleaning depends on flock size, bedding type, weather, and odor. If the coop smells strong, feels damp, or eggs are getting dirty, clean sooner.
How often should I clean my chicken coop if I only have a few hens?
If you have a small flock of three to five hens in a roomy, dry coop, you may only need daily spot checks, weekly bedding touch-ups, and a deeper clean every couple of months. However, do not rely only on flock size. A small coop with poor ventilation can get dirty faster than a larger coop with more birds. Check bedding moisture, odor, and droppings buildup. If the coop stays dry and fresh, your routine is probably working.
How often to clean chicken coop bedding?
Chicken coop bedding should be spot-cleaned whenever it becomes wet or heavily soiled. For many backyard coops, that means removing dirty spots weekly and fully replacing bedding every few weeks or months. Nesting box bedding may need changing more often because clean nest boxes help keep eggs cleaner. Wet bedding should be removed immediately. Do not simply cover wet bedding with fresh material, because trapped moisture can create odor and other coop problems.
What is the best way to clean a backyard chicken coop?
The best way is to remove chickens to a safe area, take out feeders and waterers, remove old bedding, dry scrape roosts and boards, wash only what needs washing, inspect the coop, let everything dry, and add fresh bedding. Work from top to bottom and from dry cleaning to wet cleaning. Avoid soaking a wooden coop unless it has enough time to dry. A simple, orderly process makes deep cleaning faster and more effective.
How do I keep a chicken coop clean and smell free?
To keep a chicken coop clean and smell free, focus on dryness, ventilation, and waste removal. Use absorbent bedding, remove wet spots quickly, keep waterers from spilling, and scrape droppings under roosts often. Make sure the coop has airflow above the birds without strong drafts on the roost. If odor returns quickly after cleaning, look for moisture, overcrowding, poor ventilation, or hidden manure buildup. Odor is usually a sign that something needs correction.
Do I need to disinfect my chicken coop every time I clean it?
No, routine cleaning does not always require disinfecting. For regular chicken coop maintenance, removing droppings, replacing dirty bedding, and keeping surfaces dry are usually the most important tasks. Disinfecting may be useful after illness, pest problems, or heavy contamination, but it should be done carefully. Follow product directions, keep chickens away during use, never mix chemicals, and allow the coop to dry completely before adding bedding and returning the flock.
Why are my chicken eggs dirty even though I clean the coop?
Dirty eggs often come from dirty nesting boxes, muddy hen feet, broken eggs, or hens sleeping in nests. Refresh nest bedding more often and keep nesting boxes lower than roosts if possible so chickens are less likely to sleep in them. Also check the run for mud around the coop entrance. If hens walk through mud before entering nest boxes, eggs can get dirty even when the coop floor looks clean.
Can a chicken coop be too clean?
A coop can be cleaned more often than necessary, especially if frequent washing keeps wood damp. Chickens do not need a spotless, house-like environment. They need a dry, well-ventilated, low-odor space with clean nesting boxes and safe roosting areas. Dry scraping, spot cleaning, and bedding management are often better than constantly soaking the coop. The goal is practical cleanliness, not perfection.
What should I do if my coop smells like ammonia?
A strong ammonia smell means droppings, moisture, and ventilation need attention. Remove wet or heavily soiled bedding right away, scrape droppings under roosts, and add dry bedding only after the dirty material is gone. Check for water spills, roof leaks, and poor airflow. Increase ventilation above roost height while avoiding direct drafts on the birds. If birds show signs of illness or breathing trouble, contact a poultry vet or local extension office.
Is the deep litter method easier than regular cleaning?
The deep litter method can reduce full cleanouts when managed correctly, but it is not a no-cleaning system. It requires dry carbon material, good ventilation, regular turning or fresh bedding additions, and careful moisture control. If it smells bad, becomes wet, or attracts pests, it is not working properly. Beginners can use deep litter successfully, but they should first understand what healthy bedding should smell and feel like.
Final Checklist
- Collect eggs daily and keep nesting boxes clean.
- Remove wet bedding immediately.
- Scrape roost boards at least weekly.
- Keep waterers from leaking into bedding.
- Use absorbent, chicken-safe bedding.
- Improve ventilation if odor builds up.
- Deep clean every one to three months or as needed.
- Inspect for predators, rodents, leaks, and loose hardware during cleaning.
- Contact a poultry vet or extension office for serious illness concerns.
Conclusion
A clean chicken coop does not have to be complicated. The best routine is one you can actually keep: quick daily checks, a steady weekly cleaning routine, and deeper cleaning when bedding, odor, moisture, or flock conditions call for it. If you are still wondering how often should you clean a chicken coop, start with daily spot cleaning, weekly maintenance, and monthly to seasonal deep cleaning. Then adjust based on what your coop is telling you.
Pay close attention to moisture, ventilation, bedding condition, and nesting box cleanliness. When those basics are managed well, backyard chicken coop cleaning becomes easier, your hens stay more comfortable, and your daily chicken chores feel much more manageable.