Many backyard chicken problems start at the roof. A low slope can let rain sit. A leaky seam can soak pine shavings. A poorly ventilated roof can trap moisture above the roosts. A weak overhang can let wind-driven rain blow into the feeder, waterer, and run. Once the coop stays damp, you may notice odor, dirty eggs, slippery flooring, stressed hens, and more maintenance than you expected.
The good news is that roofing a chicken coop does not have to be complicated. You do not need a fancy structure to raise a healthy backyard flock. You need the right roof material for your climate, a practical chicken coop roof pitch, enough roof ventilation, and simple rain protection details that hold up through real US weather.
This guide walks through the best roofing materials for chicken coops, including metal roofing for chicken coop builds, asphalt shingles, corrugated plastic panels, polycarbonate clear roof panels, and cheap roofing material for chicken coop projects. You will also learn how to think about snow, summer heat, coop airflow, predator safety, and common mistakes to avoid.
Quick Answer Box
The best chicken coop roof is usually a sloped, waterproof roof with good overhangs, safe ventilation, and durable material suited to your climate. For most US backyard coops, metal roofing is the most practical long-term choice because it sheds rain and snow well, lasts a long time, and is easy to clean. Asphalt shingles work on framed coops, while corrugated plastic or clear polycarbonate can help covered runs. Avoid flat roofs, poor seams, weak fastening, and roof vents that let rain blow directly onto roosts or bedding.
Best Roof for Chicken Coop
The best roof for chicken coop use is a roof that keeps the coop dry, allows stale moist air to escape, and holds up to your local weather without becoming a constant repair project. For most backyard chicken owners, that means a sloped roof with a durable outer covering, secure fasteners, drip edges or overhangs, and predator-safe ventilation near the high points of the coop.
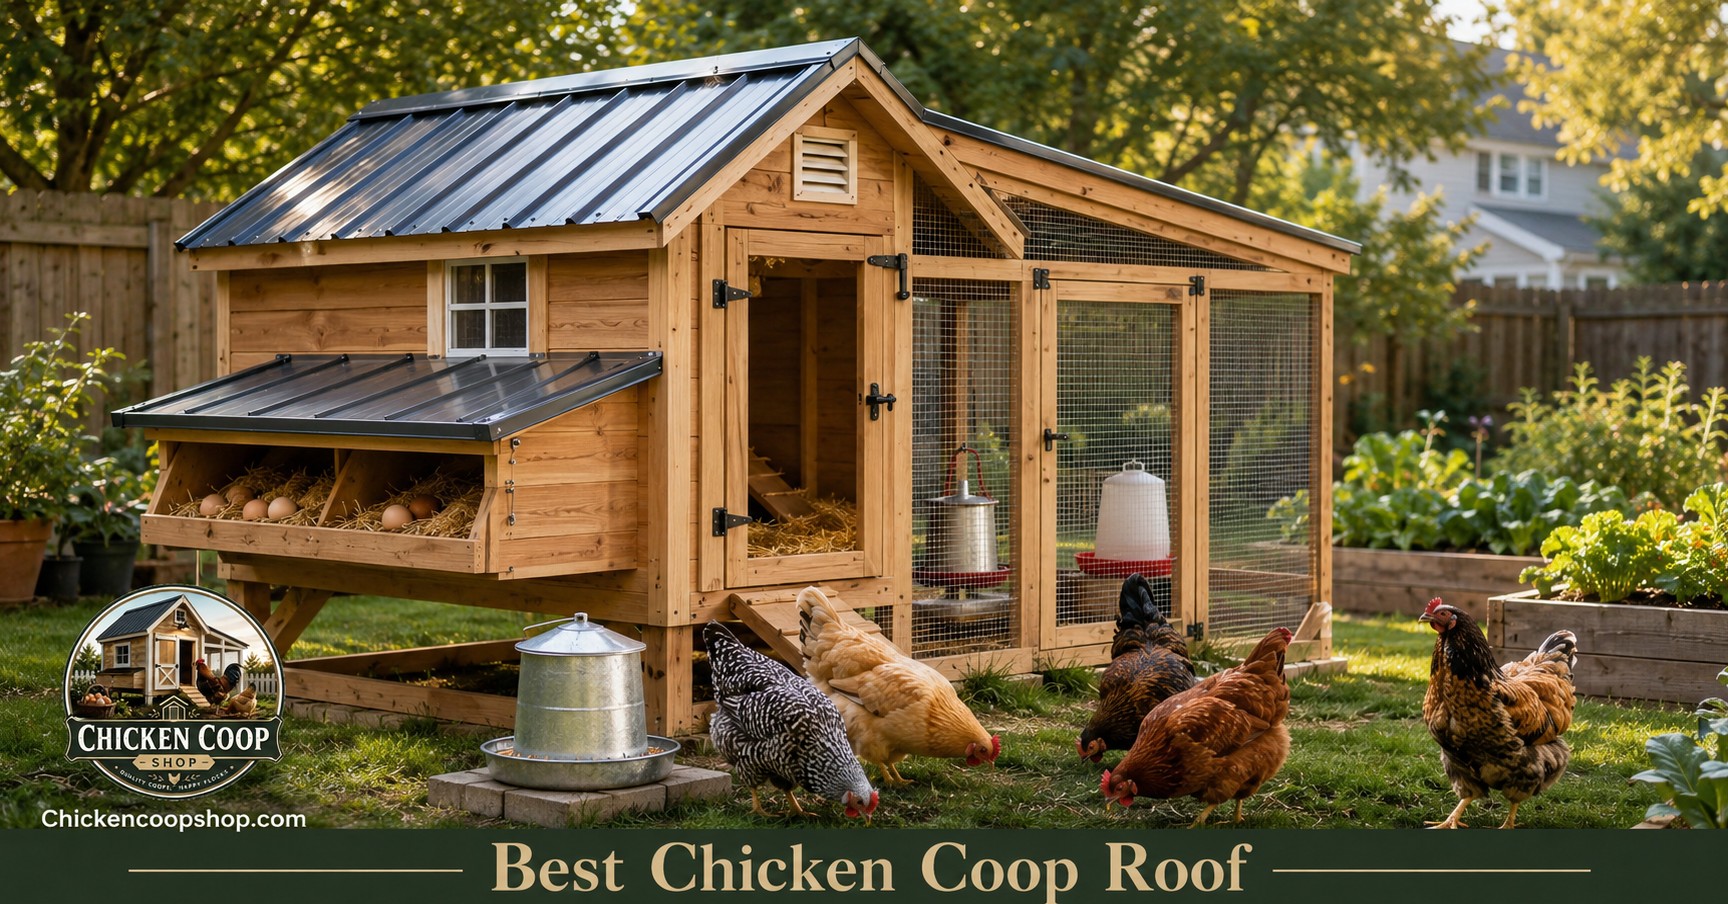
A simple shed-style roof is often the easiest option for beginners. It slopes in one direction, is easier to frame than a gable roof, and works well on small backyard coops. A gable roof, which has two sloped sides meeting at a ridge, gives a more traditional look and can create helpful attic-style space for ventilation. Either can work well if it is built with enough pitch and weather protection.
When comparing roofs for chicken coops, do not choose based only on appearance. Think about how the roof handles rain, wind, snow, sun exposure, predators, and daily chicken keeping tasks. A roof that looks cute but leaks above the nesting boxes will quickly become frustrating. A roof that traps heat in July can make hens uncomfortable. A roof that is too low to clean under can make coop maintenance harder.
For a full build-focused walkthrough, you can also read how to build a chicken coop roof. This article focuses on choosing the right design and material before you start cutting, fastening, or sealing.
Why Chicken Coop Roof Matters
A chicken coop roof is not just a cover. It is part of the coop’s moisture control, temperature control, predator protection, and long-term maintenance system. Chickens produce moisture through breathing and droppings. Water also enters the coop from rain, melting snow, spilled waterers, and damp ground. If the roof does not shed weather and help manage airflow, the coop can become humid even when it looks dry from the outside.
Moisture is one of the biggest enemies of a healthy backyard flock setup. Damp bedding can smell bad, attract flies, freeze in winter, and create a messy floor around feeders and waterers. Wet nesting boxes can lead to dirty eggs and frustrated hens. Condensation above roosting bars can drip onto birds at night, which is especially unpleasant during cold weather.
A good chicken coop roof also protects the structure itself. Wood framing, plywood, and siding last much longer when the roof sends water away from walls and corners. Overhangs help keep rain from running down door openings and windows. Proper flashing and sealing around roof penetrations can prevent slow leaks that may not be obvious until the damage is already serious.
Finally, the roof affects daily convenience. If you have to walk through mud every morning because the roof dumps water at the door, you will notice. If the run roof is too low or flimsy, cleaning becomes annoying. If the roof overhang shades the feeder and waterer, your routine gets easier. A practical roof supports both flock safety and the person caring for the flock.
Best Roofing Materials for Chicken Coops
The best roofing materials for chicken coops depend on budget, coop size, climate, framing strength, and how permanent you want the coop to be. A small movable coop may use lightweight corrugated panels. A permanent walk-in coop may deserve metal roofing. A coop designed to match a house or shed may use asphalt shingles. A covered run may benefit from clear panels that add light while keeping rain off the ground.
Before choosing roof material for chicken coop projects, ask these questions:
- How much rain, snow, wind, and sun does the coop receive?
- Is the coop permanent, movable, or temporary?
- Can the framing support heavier roofing?
- Will the roof shade the coop enough during summer?
- Will the material create condensation without proper airflow?
- Can I safely install, clean, and repair it?
No material is perfect for every backyard. Metal is durable, but it can be noisy in rain and needs correct fastening. Asphalt shingles look familiar, but they add weight and require solid decking. Corrugated plastic is affordable and light, but cheaper panels may become brittle. Clear polycarbonate brings daylight into a run, but it can increase heat if used without shade planning.
Chicken Coop Roof Material Comparison
| Roof Material | Best Use | Pros | Cons | Beginner Tip |
|---|---|---|---|---|
| Metal roofing | Permanent coops, snowy areas, rainy climates, low-maintenance builds | Durable, sheds water well, easy to clean, long service life | Can be noisy, needs proper screws, edges can be sharp during installation | Use roofing screws with rubber washers and overlap panels correctly. |
| Asphalt shingles | Coops with solid roof decking, traditional backyard designs | Familiar material, available at most home centers, good finished look | Heavier than panels, needs underlayment, not ideal for weak framing | Use proper roof deck and avoid installing shingles on very low slopes. |
| Corrugated plastic panels | Covered runs, lightweight coops, budget-friendly rain cover | Lightweight, affordable, easy to cut, lets in some light | Some panels fade, crack, or lift in wind if poorly fastened | Choose UV-rated panels and use closures to reduce leaks and drafts. |
| Polycarbonate clear roof | Runs needing daylight, winter sun, protected garden-style coops | Strong, bright, weather-resistant, useful over covered runs | Can increase summer heat, costs more than cheap plastic | Add shade cloth or partial solid roofing in hot southern climates. |
| Tarp or temporary cover | Emergency repair, short-term weather protection | Cheap, fast, useful after storm damage | Can sag, flap, leak, and fail in wind or snow | Use only as a temporary fix, not as the main long-term coop roof. |
Metal Roof for Chicken Coop
A metal roof for chicken coop projects is one of the most reliable choices for a permanent backyard setup. It is especially useful in areas with frequent rain, wet seasons, falling leaves, and moderate to heavy snow. Metal panels shed water quickly, do not absorb moisture, and are easier to rinse or sweep than many textured roofing materials.
Metal roofing for chicken coop builds usually comes in corrugated or ribbed panels. These panels are installed over roof framing, purlins, or decking depending on the design. They should overlap correctly so water runs over the seams instead of under them. Use roofing screws with rubber washers, not random wood screws, because the washer helps seal the hole around the fastener.
One beginner mistake is overtightening the screws. If the washer is crushed too hard, it may split or deform. If the screw is too loose, water can work under the washer. The goal is a snug seal. Also be careful with cut edges. Metal roofing can be sharp, so gloves and eye protection are smart during installation.
Metal roofs can create condensation when warm moist air from the coop hits a cold roof surface. This is not a reason to avoid metal, but it is a reason to plan ventilation. Ridge vents, high wall vents, gable vents, and open eaves protected with hardware cloth can help moisture escape. In cold northern climates, some owners also add an underlayment or insulated roof assembly, but airflow is still important.
If you want a roof that is durable and practical without needing constant patching, metal is often the best chicken coop roof choice for most permanent coops.
Asphalt Shingles
Asphalt shingles are a common choice when the coop is built like a small shed. They work best when installed over solid roof decking with underlayment. Many backyard chicken owners choose shingles because they match nearby sheds, garages, or homes. They are easy to find, and leftover shingles from another project can sometimes reduce cost.
The main concern is weight. Shingles are heavier than metal or plastic panels, especially when installed over plywood or OSB decking. If the coop frame is light, movable, or not square, asphalt shingles may not be the best choice. They also need enough slope to shed water properly. A very low-pitch roof can hold moisture under shingles and shorten the life of the roof.
Shingles can work well for stationary coops in mild or mixed climates. They provide a finished look, reduce rain noise compared with metal, and handle normal weather when installed correctly. However, they are not as easy to clean as smooth panels, and debris can collect on rough surfaces. Overhanging tree branches may drop leaves, pine needles, and twigs that need to be removed.
If you use asphalt shingles, pay attention to drip edge, starter strip, underlayment, and proper nail placement. These small details matter because a chicken coop roof is often smaller than a house roof, so every seam, edge, and exposed fastener is close to the interior. A small leak can land directly on bedding, nest boxes, or stored feed.
Corrugated Plastic Panels
Corrugated plastic panels are popular for covered chicken runs and lightweight roof chicken coop projects. They are affordable, easy to handle, and often available in clear, white, green, smoke, or other light-filtering options. For a small coop or run, they can be a practical way to keep rain off the ground without adding much weight.
The key is quality and fastening. Very cheap panels can crack, fade, or become brittle after sun exposure. If your coop sits in full sun, look for UV-rated panels. Use the manufacturer’s recommended fasteners, closure strips, and overlap spacing. Corrugated panels need support underneath, especially where snow or falling branches may load the roof.
These panels are often better over a run than over the enclosed sleeping area. Over a run, they reduce mud, protect dust bath areas, and help keep feeders dry. Over an enclosed coop, they can work if there is enough shade and ventilation, but clear or translucent plastic may allow too much heat during summer.
In windy areas, plastic panels must be secured well. A loose panel can flap, crack, or pull free. Add enough slope so water does not sit in the corrugations. Seal or overlap the high side correctly so wind-driven rain does not blow underneath.
Polycarbonate Clear Roof
A polycarbonate clear roof can be useful when you want a bright covered run or greenhouse-style chicken area. Compared with cheap plastic, quality polycarbonate is usually stronger and more impact-resistant. It can help keep the run drier while still allowing daylight, which is helpful in shaded yards or during shorter winter days.
Clear roof for chicken coop use needs careful planning in hot climates. In the southern and southwestern United States, a fully clear roof can trap heat and make a run uncomfortable during the afternoon. Chickens need shade, airflow, and cool water in warm weather. If you use clear panels, consider using them on only part of the roof or pairing them with shade cloth, solid roofing, trees, or a shaded wall.
Polycarbonate panels can be a smart choice over a dust bath section, winter sun area, or run extension where daylight matters. They should still be installed with a proper slope, correct fasteners, and enough support. Like other panel roofs, they can leak if the overlaps face the wrong direction or if screws are placed poorly.
If your main goal is an enclosed sleeping coop, solid metal or shingles may be more comfortable for heat control. If your goal is a bright, dry run, polycarbonate can be a premium option.
Cheap Roofing Material Options
Cheap roofing material for chicken coop projects can be useful when you are building on a budget, but cheap should not mean unsafe or leaky. The goal is to spend wisely, not to choose a material that fails after one season. A budget roof still needs slope, overhang, secure fastening, and weather protection.
Good budget-friendly options may include corrugated metal panels, leftover metal roofing, reclaimed shed roofing, asphalt shingles from a larger project, or UV-rated corrugated plastic panels. Some local farm groups, building supply stores, and salvage sources may have usable materials at lower cost. Always inspect used materials for rust holes, cracks, old nail holes, mold, and sharp damage.
Avoid relying on tarps, cardboard, thin indoor paneling, untreated plywood, or random scrap pieces as the final roof. Untreated plywood can absorb water and delaminate. Tarps sag and collect rain. Thin plastic sheets can tear in wind. These may work for emergency rain protection, but they are not good permanent roofs for chicken coops.
If your budget is tight, spend money first on the things that prevent water damage: roof pitch, waterproof outer layer, overhangs, drip edges, and secure fasteners. A plain but dry roof is much better than a decorative roof that leaks.
Best Roof Pitch for Chicken Coop
Chicken coop roof pitch is the slope of the roof. Pitch matters because it helps water, leaves, and snow move off the roof instead of sitting on top. A flat or nearly flat roof is one of the most common causes of leaks and early roof failure. Even a small coop should have enough slope for the material you choose.
Metal and corrugated panels can often work on lower slopes than shingles, but they still need enough pitch to move water. Asphalt shingles generally need a steeper, properly decked roof. In snowy areas, a steeper slope helps snow slide off instead of building weight on the structure. In rainy areas, slope helps reduce pooling and seam leaks.
For many backyard coops, a simple shed roof with a noticeable slope from front to back is practical. The high side can include protected vents, while the low side can send water away from doors, windows, and the run entrance. Make sure the roof drains to an area where water will not create mud around your daily path.
Practical tip: Before finalizing the roof, imagine a heavy rainstorm. Where will the water go? If the answer is “right in front of the coop door” or “into the chicken run,” adjust the roof direction, add gutters, extend the overhang, or improve drainage.
Roof Ventilation
A chicken coop roof vent helps warm, moist air escape from the upper part of the coop. This is especially important because chickens sleep on roosts and release moisture through breathing overnight. Droppings also add moisture. Without ventilation, that moisture can collect under the roof and cause condensation, odor, and damp bedding.
Good roof ventilation is not the same as a cold draft blowing directly on chickens. Vents should move stale air out while keeping roosting birds protected from direct wind and rain. High vents near the roofline, gable vents, ridge vents, and open eaves covered with hardware cloth can all work. The best layout depends on the coop design.
Every roof vent should be predator-safe. Use hardware cloth, not basic window screen, because raccoons and other predators can tear weak material. Fasten it securely with screws and washers or trim boards. Check vents regularly for loose edges, rust, or gaps.
Vent placement also matters. A vent directly above a roost can allow cold air or rain to reach the birds. A better design usually puts ventilation high above the birds or across the upper wall area so air can move without chilling the flock. In winter, do not seal the coop completely. Chickens handle cold better than damp, stale air.
Rain Protection
Rain protection starts with the roof but does not end there. A waterproof chicken coop roof should keep water off the bedding, walls, door frames, nesting boxes, and feed areas. If you are dealing with leaks now, see this guide to a waterproof chicken coop roof for more focused sealing ideas.
Overhangs are one of the simplest upgrades. Even a modest overhang can reduce rain running down walls and blowing into windows. The coop door, egg collection door, and pop door all benefit from overhead protection. If the roof ends exactly at the wall, water can run straight down the siding and into gaps.
Pay attention to seams, screw holes, nail holes, and roof edges. Many leaks are not dramatic. They show up as damp bedding in one corner, dark staining on wood, swelling plywood, or a musty smell. Check after heavy rain instead of waiting for obvious dripping.
Gutters can help in some setups, especially walk-in coops where roof runoff lands in a busy path. However, gutters also need maintenance. Leaves, pine needles, and feathers can clog them. If you add gutters, route water away from the coop foundation and run so you do not create mud or standing water.
Snow and Winter Protection
In cold parts of the United States, snow load and winter condensation are important roof concerns. Snow can add weight, especially on flat or low-slope roofs. Wet snow is heavier than light powder. If your coop is in a snowy climate, a stronger frame, steeper pitch, and durable roofing material are worth considering from the beginning.
Metal roofing often performs well in snow because it sheds snow more easily than rough materials. That can be helpful, but sliding snow needs somewhere safe to land. Avoid dumping snow directly in front of the pop door, human door, or feeder area. If needed, use a roof direction that sends snow away from daily access areas.
Winter coop problems often come from moisture, not just cold. If warm air from the flock rises and hits a cold roof, condensation can form. That moisture may drip back down or make wood damp. Proper ventilation near the top of the coop helps. Dry bedding, clean droppings boards, and good waterer placement also reduce moisture.
Do not cover every vent in winter. It may feel logical to seal the coop tightly, but a sealed coop can become humid and unhealthy. The goal is draft-free ventilation: fresh air exchange without wind blowing directly onto roosting hens.
Summer Heat Control
A roof for chicken coop comfort must also handle summer heat. In hot states, the roof can either protect the flock or turn the coop into a heat box. Dark roofs absorb more heat. Clear panels allow sunlight in. Low ventilation traps warm air. Small coops in full sun can heat up quickly.
For summer heat control, shade and airflow are your best friends. A light-colored metal roof, reflective roofing, roof overhangs, shade trees, shade cloth, and high vents can all help. If the coop is in full sun, avoid using clear roof panels over the entire enclosed coop. Clear panels may be better on part of the run where birds can choose sun or shade.
Make sure hot air can escape from the highest part of the coop. Warm air rises, so high ventilation is more effective than a tiny low vent. Windows covered with hardware cloth can also help, but they should be protected from rain and predators.
During heat waves, roof design works together with daily care. Keep waterers full, provide shade, avoid overcrowding, and check birds during the hottest part of the day. If chickens show signs of serious heat stress or illness, contact a poultry vet or local extension office for guidance.
Problems, Causes, and Solutions
| Problem | Likely Cause | Practical Solution | Prevention Tip |
|---|---|---|---|
| Wet bedding after rain | Roof leak, short overhang, wind-driven rain, or water running toward the coop | Inspect seams, screws, edges, and door openings after a storm. Patch leaks and improve runoff. | Add overhangs, drip edge, better drainage, or a covered entry area. |
| Condensation under roof | Warm moist air trapped inside the coop | Add high ventilation, clean droppings more often, and keep waterers from spilling. | Use predator-safe vents near the roofline and avoid sealing the coop tightly. |
| Run turns muddy | Roof runoff draining into run or uncovered ground exposed to rain | Redirect water, roof part of the run, add drainage, and use appropriate run footing. | Plan roof slope so runoff moves away from the run entrance. |
| Coop too hot in summer | Dark roof, clear panels, full sun, or poor airflow | Add shade, increase high ventilation, use reflective roofing, or cover clear panels with shade cloth. | Place coop where it gets morning sun and afternoon shade when possible. |
| Roof panel lifts in wind | Poor fastening, too few screws, or weak framing | Reinstall with correct fasteners, add supports, and follow panel overlap directions. | Use roofing screws, closure strips, and enough framing support for your wind exposure. |
Mistakes to Avoid
The first mistake is building a flat roof because it seems easier. Flat roofs are rarely easier in the long run. They collect water, leaves, snow, and debris. Even if the material is waterproof at first, standing water finds weak points over time.
The second mistake is ignoring roof overhangs. A roof that stops flush with the wall lets water run down siding, doors, windows, and nest box lids. This can create leaks in places that are hard to diagnose. A small overhang can make the whole coop more forgiving.
The third mistake is creating ventilation that also creates drafts. Chickens need fresh air, but they should not sleep in a cold wind tunnel. Place vents high and protect them from rain. Use hardware cloth to keep predators out.
The fourth mistake is choosing clear roofing without thinking about heat. Clear roof panels can be great over a run in cool months, but they can make summer conditions worse when used without shade. Chickens must be able to move away from direct sun.
The fifth mistake is using weak or temporary materials as a permanent roof. A tarp may save the coop during an emergency storm, but it should not be the final plan for a backyard flock. Loose tarps flap, hold water, and can fail when you need protection most.
The sixth mistake is forgetting maintenance access. If the roof is too steep, too slippery, too low, or blocked by fencing, small repairs become harder. A practical chicken coop roof is one you can safely inspect and maintain.
Maintenance Plan
Even the best chicken coop roof needs occasional attention. A few quick checks can prevent expensive repairs and keep the coop dry. The best time to inspect is after heavy rain, strong wind, snow melt, and seasonal leaf drop.
| Maintenance Task | How Often | Why It Matters | What to Look For |
|---|---|---|---|
| Check roof seams and fasteners | Every 2 to 3 months and after storms | Loose seams and screws are common leak points | Raised panels, missing screws, cracked washers, rust spots |
| Inspect bedding after rain | After heavy rain | Damp bedding is often the first sign of a roof or runoff problem | Wet corners, musty smell, dark wood, damp nest boxes |
| Clear leaves and debris | Monthly in fall or near trees | Debris holds moisture and can block runoff | Leaves in valleys, gutters, panel grooves, and roof edges |
| Check vents and hardware cloth | Monthly | Ventilation must stay open and predator-safe | Loose staples, bent wire, rust, gaps, blocked airflow |
| Review shade and heat control | Before summer | Roof heat can stress the flock during hot weather | Full sun exposure, hot interior air, poor air movement |
My Practical Recommendation Section
If you already have solid roof decking and want the coop to match another building, asphalt shingles can work. Just make sure the framing can support the weight and the slope is appropriate. For a covered run, corrugated plastic or polycarbonate panels can be helpful, especially if you need daylight and rain protection. In hot climates, use clear roof panels carefully and provide shade.
Before buying material, sketch the roof direction, runoff path, vent placement, and daily access points. Decide where rain will land, where snow might slide, and how you will clean or repair the roof later. Then choose material. This order prevents many beginner mistakes.
If you want more visual layout inspiration, review chicken coop roofing ideas. If you are still designing the entire coop, start with DIY chicken coop plans for beginners so the roof, roosts, nesting boxes, run, feeder area, and ventilation all work together.
FAQs
What is the best chicken coop roof for beginners?
The best chicken coop roof for beginners is usually a simple sloped shed roof with metal panels or another durable waterproof material. A shed roof is easier to frame than a complex roof, and it gives you a clear direction for rain runoff. Add overhangs on the sides, place vents high but away from direct drafts, and use predator-safe hardware cloth over any openings. Beginners should focus less on fancy design and more on dryness, airflow, access, and easy maintenance.
Is metal roofing good for chicken coops?
Yes, metal roofing is a very good option for many chicken coops. It sheds rain and snow well, does not absorb moisture, and can last a long time when properly installed. It is especially useful for permanent backyard coops in wet or snowy areas. The main things to watch are sharp edges during installation, correct screw placement, rubber washer fasteners, and condensation control. A metal roof still needs good ventilation so moist air from the flock does not collect under the roof.
Can I use a clear roof for chicken coop areas?
You can use a clear roof for chicken coop runs or selected areas, especially when you want more daylight and rain protection. Polycarbonate clear roof panels are often stronger than cheap plastic panels and can work well over a covered run. The caution is summer heat. In hot climates or full-sun yards, a clear roof can make the space too warm. Provide shade, airflow, and an option for chickens to move out of direct sun. Clear panels are usually better for runs than enclosed sleeping areas.
What roof pitch should a chicken coop have?
The best chicken coop roof pitch depends on the roofing material and climate, but the roof should never be flat. A noticeable slope helps rain, leaves, and snow move off the coop. Metal and corrugated panels may work with moderate slopes if installed correctly, while asphalt shingles usually need a steeper roof with solid decking and underlayment. In snowy regions, steeper slopes and stronger framing are more important. Always check the roofing material guidance and think about where runoff will land.
Do chicken coops need roof vents?
Most chicken coops benefit from roofline ventilation or high wall ventilation because moist air rises. Chickens produce moisture overnight through breathing and droppings, and that moisture needs a way to escape. Roof vents, ridge vents, gable vents, or open eaves can help when they are protected from rain and predators. The key is to avoid direct drafts on roosting birds. Ventilation should move stale air out above the flock, not blow cold wind across the roosts during winter nights.
What is the cheapest roofing material for a chicken coop?
The cheapest practical roofing material is often reclaimed metal roofing, leftover asphalt shingles, or budget corrugated panels. However, the cheapest option is not always the best value if it leaks or fails quickly. Avoid using tarps, untreated plywood, cardboard, or thin indoor materials as a permanent roof. A budget chicken coop roof should still have slope, overhang, secure fasteners, and weather-resistant material. If money is tight, choose a simple design and spend first on waterproofing and safe ventilation.
How do I stop rain from blowing into my chicken coop?
Start by checking roof overhangs, door direction, window openings, and vent placement. Wind-driven rain often enters through gaps, short roof edges, or vents facing the storm side. Add overhangs, awnings, exterior trim, or angled covers above vulnerable openings. Keep ventilation open, but shield it so rain cannot blow directly onto roosts or bedding. Also check the ground slope around the coop. If water drains toward the structure, roof repairs alone may not solve the wet bedding problem.
Can a chicken coop roof help prevent muddy runs?
Yes, a roof can help prevent muddy runs by keeping rain off the highest-traffic areas. A covered run roof protects feeders, waterers, dust bath areas, and the path near the pop door. However, roof runoff must be directed away from the run. If the roof dumps water into the chicken yard, the mud problem may get worse. Combine roofing with drainage, dry footing material, and smart feeder placement. Even partial run roofing can make daily backyard chicken care much easier.
Should I insulate a chicken coop roof?
Roof insulation may help in some extreme climates, but many backyard coops do not need heavy insulation if they are dry, draft-protected, and well ventilated. The bigger priority is moisture control. A tightly sealed insulated coop can still become damp and unhealthy without airflow. In very hot or very cold regions, insulation or radiant barrier materials may be useful, but they should be protected from pecking and pests. If you are unsure about your climate, ask a local extension office for region-specific coop guidance.
How often should I inspect my chicken coop roof?
Inspect your chicken coop roof every few months and after major weather events. Check after heavy rain, strong wind, hail, snow melt, or falling branches. Look for wet bedding, stains on wood, loose screws, cracked washers, lifted panels, missing shingles, blocked vents, and rust. Also check the inside of the coop because interior clues often reveal roof problems early. A quick inspection can prevent small leaks from becoming rotten wood, damp bedding, dirty eggs, or expensive repairs.
Final Checklist
- Choose a sloped roof design instead of a flat roof.
- Pick roofing material based on climate, budget, coop size, and framing strength.
- Use metal roofing for a durable, low-maintenance permanent coop when possible.
- Use asphalt shingles only with solid decking, underlayment, and adequate slope.
- Use clear or polycarbonate panels carefully in hot climates.
- Add overhangs to protect walls, doors, nest boxes, and the run entrance.
- Place roof vents high, protected from rain, and away from direct roost drafts.
- Cover all vents and openings with secure hardware cloth for predator safety.
- Direct roof runoff away from the coop door, run, feeder, and waterer.
- Inspect seams, fasteners, bedding, and vents after major storms.
- Keep the roof easy to access for cleaning, maintenance, and seasonal checks.
- Fix small leaks quickly before they create damp bedding, odor, or wood damage.