
How to Build a Chicken Coop Roof
Building a chicken coop roof may seem difficult at first, but with the right plan, materials, and step-by-step guidance, even beginners can create a strong, weather-resistant roof for their backyard chickens.
A proper roof is one of the most important parts of a chicken coop because it protects your flock from:
- Rain
- Snow
- Heat
- Wind
- Moisture
- Predators
Without a good roof, chickens can quickly become stressed, sick, or uncomfortable. Poor roofing also creates expensive repair problems later.
The good news is that building a chicken coop roof does not require professional construction experience. Many backyard chicken owners successfully build durable roofs using affordable DIY materials and basic tools.
In this complete guide, you will learn:
- How to build a chicken coop roof step-by-step
- Best roof styles for backyard coops
- Cheap DIY roofing ideas
- Roof framing basics
- Waterproofing techniques
- Roof ventilation methods
- Best roofing materials
- Insulation tips
- Common mistakes to avoid
By the end of this guide, you will know exactly how to build a strong and long-lasting chicken coop roof that keeps your flock safe throughout every season.
Why a Chicken Coop Roof Is So Important
Many beginners focus mainly on nesting boxes and flooring while ignoring roof quality.
However, your roof controls:
- Indoor temperature
- Moisture levels
- Airflow
- Rain protection
- Snow resistance
- Predator security
A weak roof often causes:
- Wet bedding
- Mold growth
- Ammonia buildup
- Wood rot
- Heat stress
- Freezing conditions
A properly designed roof dramatically improves overall chicken health and reduces long-term maintenance.
Best Roof Types for Chicken Coops
Before building, you must choose the right roof style.
Different roof designs work better for different climates and coop sizes.
1. Slanted Roof (Lean-To Roof)
A slanted roof is one of the easiest options for beginners.
This design uses one high wall and one lower wall.
Advantages
- Easy to build
- Low material cost
- Excellent rain runoff
- Beginner friendly
- Great for small coops
Best For
- Small backyard coops
- Warm climates
- Budget DIY projects
2. Gable Roof
A gable roof has two angled roof sections that meet in the center.
This is one of the strongest roofing styles.
Advantages
- Better ventilation
- Improved attic airflow
- Snow drainage
- Attractive appearance
- Strong structure
Best For
- Large coops
- Cold climates
- Snowy regions
3. Flat Roof
Flat roofs are simple but less ideal.
Problems
- Poor drainage
- Water pooling
- Leak risk
- Weak snow handling
Flat roofs are generally not recommended unless properly waterproofed.
4. Curved Roof
Curved roofs create a unique modern appearance.
Benefits
- Good rain runoff
- Stylish design
- Wind resistance
However, they require more advanced building skills.
Best Roofing Materials for Chicken Coops
Choosing the right roofing material is extremely important.
Corrugated Metal Roofing
Metal roofing is one of the best overall choices.
Benefits
- Long lifespan
- Waterproof
- Durable
- Fire resistant
- Easy maintenance
Metal roofs are especially popular for backyard chicken coops because they handle rain extremely well.
Asphalt Shingles
Shingles provide a traditional appearance.
Advantages
- Attractive look
- Good insulation
- Weather resistant
Disadvantages
- Heavier
- More expensive
- Harder installation
Polycarbonate Panels
These lightweight panels allow natural sunlight into the coop.
Benefits
- Bright interior
- Lightweight
- Easy installation
They work especially well for attached runs.
PVC Roofing Panels
PVC panels are affordable and lightweight.
Good for small DIY coops.
Tools Needed to Build a Chicken Coop Roof
Before starting construction, gather your tools.
Basic Tools
- Measuring tape
- Circular saw
- Power drill
- Hammer
- Roofing screws
- Ladder
- Pencil
- Level
- Safety gloves
- Safety glasses
Materials Needed
Common materials include:
- Treated lumber
- Plywood
- Roofing panels
- Roofing felt
- Screws
- Nails
- Waterproof sealant
- Vent mesh
Step 1: Measure Your Chicken Coop
Proper measurements are extremely important.
Measure:
- Coop width
- Coop length
- Wall height
- Desired roof pitch
Always include extra inches for roof overhang.
Why Overhang Matters
Roof overhang helps:
- Protect walls from rain
- Improve drainage
- Reduce mud around coop
- Increase ventilation
Most coops benefit from 8–12 inch overhangs.
Step 2: Choose Roof Pitch
Roof pitch determines the roof angle.
Steeper roofs improve:
- Snow runoff
- Rain drainage
- Ventilation
A common beginner roof pitch is:
- 3:12
- 4:12
- 5:12
Steeper roofs are usually better for rainy climates.
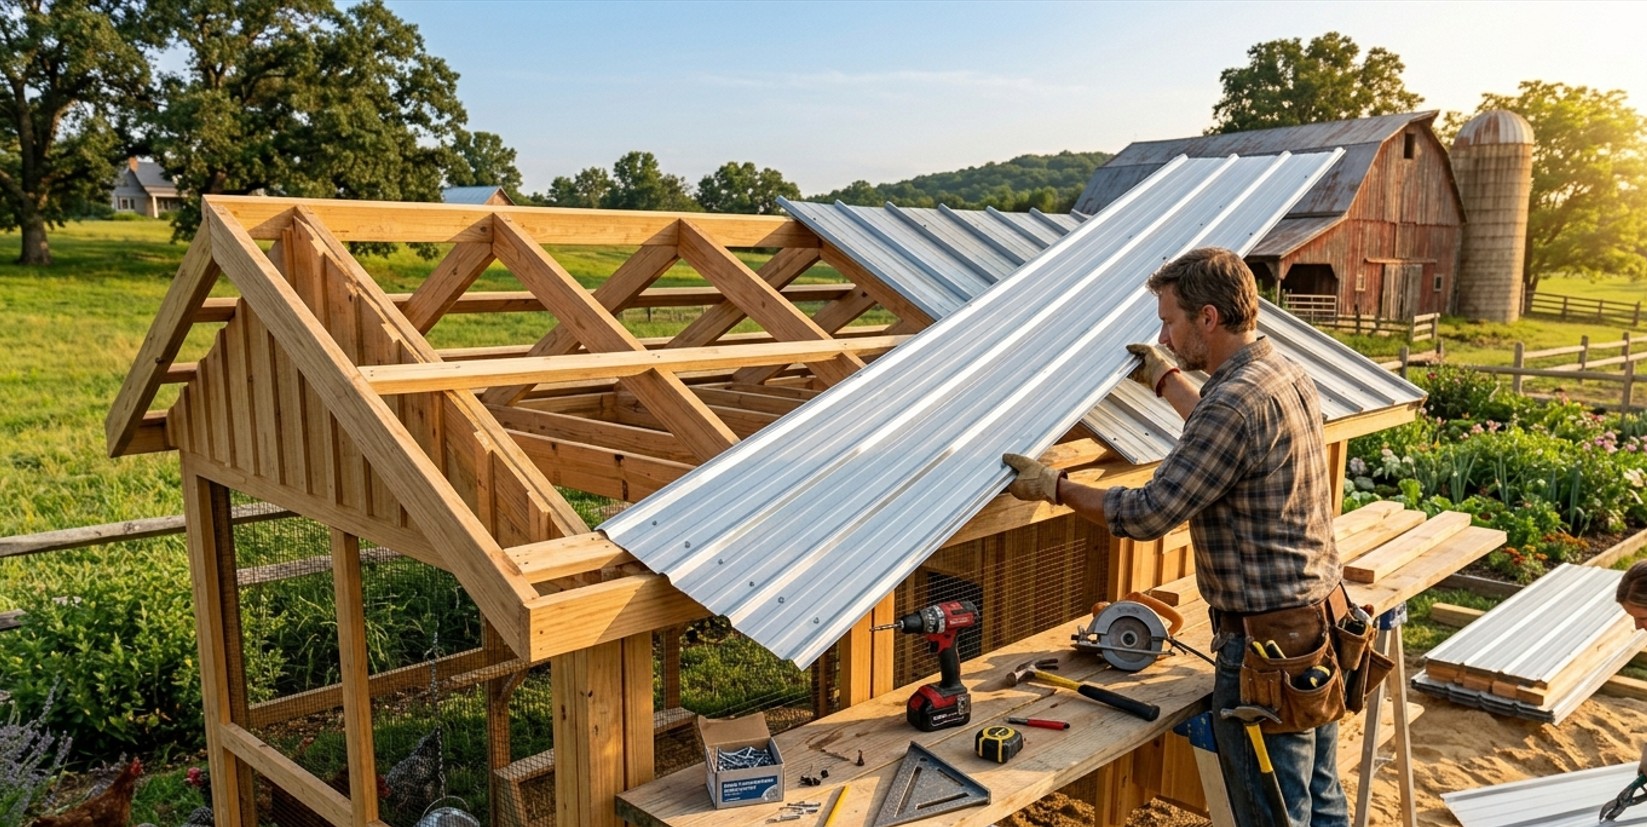
Step 3: Build the Roof Frame
The roof frame creates the structural support.
Use pressure-treated lumber for durability.
Common Lumber Sizes
- 2×4
- 2×6
Roof Frame Components
- Rafters
- Ridge board
- Cross supports
- Roof braces
Ensure the frame feels completely solid before adding roofing materials.
Step 4: Install Rafters
Rafters support the roof covering.
Spacing is important.
Typical spacing:
- 16 inches apart
- 24 inches apart
Closer spacing increases strength.
Step 5: Install Roof Decking
Roof decking creates the base surface.
Most builders use plywood sheets.
Best Plywood Thickness
- 1/2 inch
- 5/8 inch
Secure plywood tightly with screws.
Step 6: Add Waterproof Underlayment
Underlayment protects against moisture.
Most common option:
- Roofing felt
This layer prevents leaks underneath roofing panels.
Step 7: Install Roofing Material
Now install your final roofing surface.
Installing Corrugated Metal Roofing
Metal roofing is beginner friendly.
Installation Tips
- Start from bottom edge
- Overlap panels properly
- Use rubber washer screws
- Seal joints carefully
Installing Asphalt Shingles
Steps
- Install starter strip
- Lay shingles upward
- Overlap rows correctly
- Nail securely
Installing Polycarbonate Panels
Important Tips
- Pre-drill holes
- Avoid overtightening
- Allow expansion space
Step 8: Install Roof Ventilation
Ventilation is essential for chicken health.
Poor airflow causes:
- Ammonia buildup
- Excess moisture
- Heat stress
- Respiratory illness
Best Roof Ventilation Methods
Ridge Vent
Allows hot air to escape naturally.
Side Vents
Improves cross ventilation.
Gable Vents
Excellent for larger coops.
Always cover vents using hardware cloth to stop predators.
Step 9: Add Roof Overhangs
Roof overhangs provide major benefits.
They help:
- Reduce rain splash
- Protect walls
- Improve shade
- Improve airflow
Most backyard coops benefit from extended overhangs.
Step 10: Waterproof the Roof
Even tiny leaks can damage your coop.
Waterproofing Tips
- Seal screw holes
- Use flashing
- Add gutter systems
- Use waterproof tape
- Inspect seams carefully
Step 11: Test for Leaks
Before finishing, spray water over the roof.
Inspect inside carefully.
Fix leaks immediately.
Best Chicken Coop Roof for Hot Climates
Heat management becomes critical in southern regions.
Recommended Features
- Reflective roofing
- White roofing color
- Roof vents
- Solar fans
- Shade cloth
Metal roofs with proper ventilation perform very well in hot weather.
Best Chicken Coop Roof for Cold Climates
Cold climates require insulation and snow handling.
Recommended Features
- Steep roof pitch
- Strong framing
- Insulation
- Moisture barriers
Proper airflow is still important during winter.
Roof Insulation Tips
Insulation helps stabilize coop temperatures.
Common Insulation Options
- Foam board
- Reflective insulation
- Fiberglass batts
Always protect insulation from moisture.
Predator-Proof Roof Design
Predators may attack from above.
Protect your coop using:
- Strong roofing panels
- Hardware cloth
- Reinforced joints
- Secure edges
Raccoons can easily damage weak roofing systems.
Cheap DIY Chicken Coop Roof Ideas
Building on a budget is completely possible.
Affordable Options
- Reclaimed metal sheets
- Recycled lumber
- Pallet wood
- PVC roofing
- Used shingles
Many excellent coops are built with recycled materials.
Common Chicken Coop Roof Mistakes
1. Poor Ventilation
This is one of the biggest beginner mistakes.
Without airflow:
- Moisture builds up
- Ammonia increases
- Chickens become sick
2. Flat Roof Problems
Flat roofs trap water easily.
Always prioritize drainage.
3. Weak Roof Framing
Weak rafters can collapse during storms or snow.
4. Cheap Fasteners
Low-quality screws rust quickly.
Use exterior-grade hardware.
5. No Waterproofing
Even strong roofing materials need proper sealing.
Roof Maintenance Tips
Regular inspections increase roof lifespan.
Monthly Maintenance
- Check screws
- Remove debris
- Inspect leaks
- Clean gutters
Seasonal Maintenance
- Check snow damage
- Inspect sealant
- Trim nearby branches
How Long Does a Chicken Coop Roof Last?
Roof lifespan depends on materials.
Average Lifespans
- Metal roofing: 30–50 years
- Asphalt shingles: 15–25 years
- PVC panels: 10–20 years
Proper maintenance greatly increases durability.
Best Roof Color for Chicken Coops
Color affects heat absorption.
Hot Climates
Choose:
- White
- Light gray
- Reflective silver
Cold Climates
Darker colors may help absorb warmth.
Should Chicken Coop Roofs Be Insulated?
Insulation is helpful but not always necessary.
In moderate climates, ventilation is often more important than insulation.
Can You Use Solar Panels on Chicken Coop Roofs?
Yes.
Many chicken owners now install:
- Solar fans
- Solar lights
- Small solar systems
This works especially well with metal roofing.
DIY Chicken Coop Roof Cost
Costs vary depending on size and materials.
Average Small Coop Roof Cost
- Budget DIY: $100–$300
- Mid-range: $300–$700
- Premium roofing: $700+
Using reclaimed materials can reduce costs dramatically.
Frequently Asked Questions
What is the best roof for a chicken coop?
Metal slanted roofs are often considered the best overall option due to durability and waterproof performance.
How steep should a chicken coop roof be?
Most backyard coops use pitches between 3:12 and 6:12.
Do chicken coops need roof ventilation?
Yes. Proper airflow is critical for healthy chickens.
Is metal roofing safe for chickens?
Yes. Metal roofing is durable, waterproof, and widely used for chicken coops.
How do you waterproof a chicken coop roof?
Use underlayment, flashing, roof sealant, and proper panel overlaps.
Final Verdict
Learning how to build a chicken coop roof is one of the most valuable skills for backyard chicken owners.
A strong roof improves:
- Chicken health
- Coop cleanliness
- Temperature control
- Predator protection
- Long-term durability
For most DIY builders, a slanted metal roof provides the best balance of:
- Affordability
- Easy installation
- Weather protection
- Low maintenance
By following the step-by-step methods in this guide, you can build a durable chicken coop roof that protects your flock for many years while improving the overall efficiency and appearance of your backyard coop setup.