
Framing a chicken coop is the first step to keeping your chickens safe. A sturdy frame means your coop can handle bad weather and keep out predators. In this guide, I’ll show you how to frame a chicken coop step-by-step. You’ll learn how to choose the best materials, build the base, and put up strong walls and a roof. Even if you’re new to DIY projects, this guide will help you get it right. A solid frame means a long-lasting coop, giving your chickens a secure home for years to come.
Tools and Materials Needed for Framing a Chicken Coop
Before you start building, make sure you have the right gear. The right tools and materials make a huge difference, and they’ll help you avoid headaches down the road. Here’s what you’ll need to build a sturdy chicken coop frame:
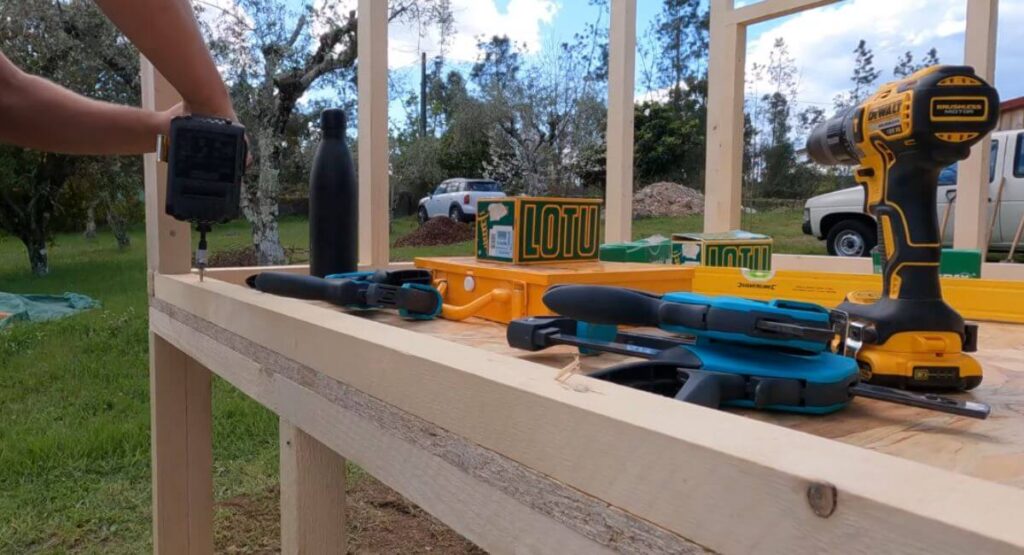
1. Essential Tools List
The tools you use will make or break this project. Here are the essentials:
Measuring Tape: Helps you get your measurements right the first time.
Hammer and Nails: The basics for fastening wood together—reliable and simple.
Power Drill: You’ll need this for driving screws quickly and securely.
Framing Square: Keeps your angles straight so your walls aren’t wonky.
Level: Makes sure your base and walls are even. No one wants a crooked coop.
Saw: A good hand saw or circular saw is key for cutting lumber to size.
Screws and Screwdriver: Go for weather-resistant screws that won’t rust.
Clamps: Hold pieces in place while you work—trust me, they help.
Ladder: You’ll need one when you’re putting up the roof.
These are the basic tools for building a chicken coop that will stay standing.
2. Materials List
Now, let’s talk materials. High-quality supplies will save you from repairs down the road:
Lumber: The best wood for chicken coop framing is pressure-treated lumber. Look for 2x4s and 4x4s—they’re strong and reliable.
Plywood: Use plywood for the floor and walls. It adds stability to your frame.
Hardware Cloth: Keeps predators out while allowing airflow through windows and vents.
Metal Brackets: These add strength to corners and joints.
Nails, Screws, and Bolts: Choose stainless steel or galvanized options so they won’t rust.
Roof Materials: Consider using tin or shingles. Tin is light and durable; shingles insulate better.
Gather these materials to build a chicken coop that can handle rough weather and curious critters.
3. Tips on Choosing Quality Materials
Not all wood and hardware are created equal. Here’s what to look for:
Pick Pressure-Treated Wood: It’s the best wood for chicken coop framing because it resists rot, insects, and moisture. This makes it ideal for outdoor use.
Use Rust-Proof Hardware: Stainless steel or galvanized screws and nails won’t corrode over time.
Choose exterior-grade plywood: It can handle rain and damp better than regular plywood.
Select Your Roofing Materials Wisely: Tin is long-lasting and light, while shingles offer better protection from heat and cold. Consider your local weather.
Buy a Little Extra: Mistakes happen, so having a few extra boards or nails can save you a trip to the hardware store.
With quality tools and materials, you’ll have a strong and safe coop that lasts for years.
Planning the Frame: Key Considerations
Before you start building, make sure you’ve thought things through. A bit of planning now will save you a lot of trouble later.
1. Size and Space Requirements
First, figure out how big your coop needs to be. Use a reliable chicken coop size guide to help. Each chicken needs 3 to 4 square feet inside the coop. If you plan for five chickens, that means 15 to 20 square feet. It’s always smart to plan for more space if you think you’ll add more chickens later.
Don’t forget to think about the height of the coop. Taller coops make it easier to add roosts and nesting boxes. Plus, they give your chickens a bit more room to stretch their wings. A well-sized coop isn’t just about comfort—it helps keep your chickens healthy, too.
2. Location & Site Preparation
Next, decide where to build your coop. Choosing a location for a chicken coop matters more than you might think. Pick a sunny spot that gets morning light to help keep things dry. Afternoon shade is great for keeping the coop cool in the summer.
Check the ground, too. Good drainage is a must. Slightly higher ground works best to keep water away from the coop. If your area gets muddy, consider a gravel base or even a concrete slab. Also, think about predators. Keep the coop away from dense bushes or trees where animals might hide. A fence around the coop adds extra protection.
3. Ventilation Needs
Ventilation is crucial for keeping your chickens healthy. Good airflow prevents moisture buildup, which can cause mold and sickness. Make sure you have windows or vents on several sides of the coop to let fresh air in. In hot climates, bigger vents can help cool things down. In cold areas, smaller vents can reduce chilly drafts.
Put ventilation high up, near the roof. That way, heat and moisture can escape without blowing directly on your chickens. Adjustable vents are a great option, letting you control airflow as the seasons change.
4. Insulation Considerations
Good insulation makes your coop comfortable all year round. In cold areas, insulated walls can help keep the coop warm and protect against frostbite. You might want to use foam board insulation if you live where winters get really cold. In hotter climates, focus on keeping things cool by adding reflective roofing or some shade.
The goal is balance. Insulate enough to keep things cozy in winter, but not so much that air can’t circulate. If your coop is big, think about dividing it into smaller areas to control temperature and reduce drafts.
By thinking through these details—size, location, ventilation, and insulation—you’ll be off to a strong start. Careful planning now makes building the coop a whole lot easier later.
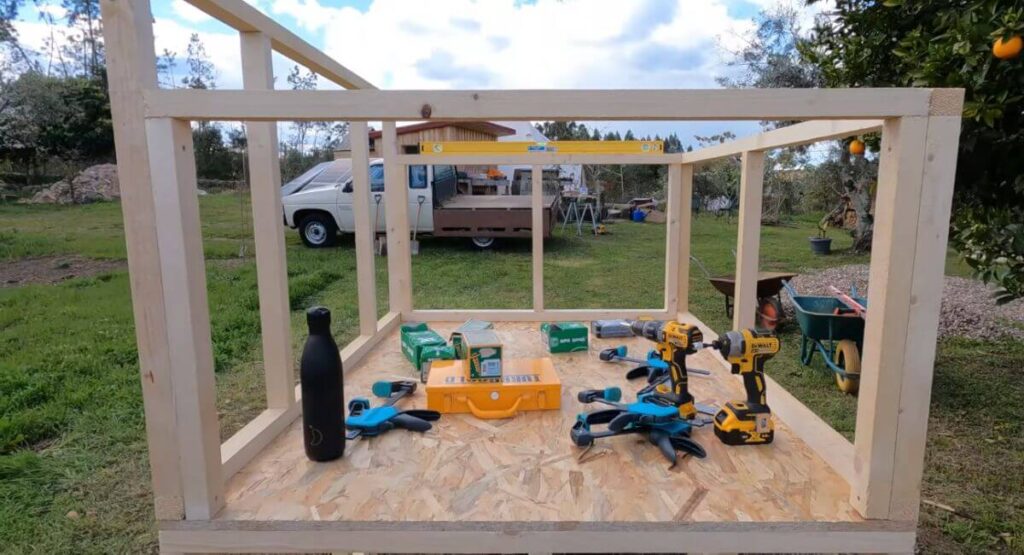
Step-by-Step Guide to Framing a Chicken Coop
Building a chicken coop that lasts takes careful framing. Here’s a simple step-by-step chicken coop framing guide to help you get it right from start to finish.
Step 1: Measure and Cut Lumber
Start by measuring your lumber. This might seem basic, but it’s where many mistakes happen. Measure twice and cut once to avoid wasted wood. A framing square is your best friend here. It’ll help you keep your cuts straight and your angles perfect.
Safety first—put on goggles and gloves before you start cutting. If you’re using power tools, keep cords out of the way. Always double-check measurements before you cut.
Step 2: Assemble the Base Frame
A solid base is the foundation for a sturdy coop. Use pressure-treated wood since it stands up well to rot and pests. Lay out the base and make sure it’s level. If your yard is uneven, add gravel or concrete blocks to level things out.
Take your time here. An uneven base can cause headaches later. Use a level to check and adjust until it’s just right.
Step 3: Build the Wall Frames
Now, move on to the wall frames. Cut your lumber to the right lengths, keeping measurements consistent. Use nails or screws to attach each piece. A framing square will help keep your corners sharp and true.
Decide where to place the door and windows before you build the walls. Mark those spots clearly. Reinforce the areas around them, so they’re strong enough to handle regular use.
Step 4: Attach the Wall Frames to the Base
It’s time to stand up your walls. Attach each wall frame to the base, securing them with screws or nails. Use diagonal braces to keep everything stable while you work. Check each wall with a level to make sure it’s straight. Proper bracing here will save you from a wobbly coop down the road.
Step 5: Construct the Roof Frame
The roof is what keeps your chickens dry, so it’s important to get it right. Choose the roof style before you begin. A flat roof is easy to build, but a sloped roof is better for rain. An A-frame is strong and good for heavy snow.
Install rafters or trusses depending on the roof type you choose. Keep them evenly spaced and firmly secured to the wall frames. A strong roof makes the whole coop sturdier.
Step 6: Add Doors and Windows
If you haven’t already, cut out spots for the door and windows. Use secure frames around each opening. Make sure everything fits snugly. Predators are crafty, so go with sturdy locks and use hardware cloth over window openings.
Doors should swing outward. Predators find it more difficult to enter. Check that everything is stable before moving forward.
Step 7: Apply Reinforcements
To make sure your coop can handle bad weather, add reinforcements. Diagonal braces in the corners will stop the coop from shaking. Gussets can also add strength to joints.
For extra stability, metal brackets are a good choice. They’ll help your coop stand strong against wind and wear.
By following these steps, you’ll know how to build a strong chicken coop frame that protects your flock. Take it slow, get each step right, and you’ll have a sturdy coop that lasts for years.
Tips for Strong and Secure Framing
Building a solid chicken coop is all about getting the frame right. It’s what keeps your chickens safe, no matter the weather. Here’s how to make sure your coop is strong and secure—how to reinforce a chicken coop and protect it from the elements.
Reinforce Weak Spots
Start with the corners. These are the parts that often give out first. Add diagonal braces to each corner for extra support. These braces help keep the frame steady, even in bad weather.
Be especially mindful of the spaces surrounding doors and windows. They get a lot of wear and tear, so use stronger wood there. Metal brackets can add extra strength, making sure your coop stays firm over time.
Choose Good Fasteners
Not all fasteners are the same. Go with long, galvanized screws instead of nails. Screws hold tight and resist rust, which is important when the weather changes. Double-check that everything is snug, especially around load-bearing parts like the roof.
If you want an even stronger hold, use a little construction adhesive with your screws. It helps seal gaps and gives extra grip.
Cross-Brace for Stability
To keep your coop from swaying, add cross-braces. These X-shaped braces give the frame extra strength, connecting one side to the other. They’re especially important for bigger coops that face strong winds.
For large coops, gussets are a good choice too. These small plates, made of wood or metal, help joints stay tight and firm. They add a bit more stability to key points.
Weatherproof the Frame
Weatherproofing protects your coop from rain, wind, and snow. Use outdoor-grade caulk to seal all joints and gaps. This stops moisture from sneaking in and causing rot. Focus on corners and around openings.
Treated wood is a smart choice since it holds up well against moisture and pests. If you’re using untreated wood, coat it with a weatherproof stain or paint. Check every few years to see if it needs a fresh coat.
Build a Strong Roof
A good roof keeps everything underneath safe. Go with a sloped roof to shed rain and snow easily. Adding a drip edge along the roof helps keep water away from the frame. Metal roofs or asphalt shingles work well in most areas.
In very wet climates, adding gutters might be worth it. Gutters direct rainwater away, keeping the coop’s base dry and safe.
Raise the Coop Off the Ground
Keep the base of your coop dry by raising it off the ground. A few inches can have a significant impact. Use treated wood posts, concrete blocks, or a gravel base to elevate it. Make sure it’s level before securing everything in place.
Taking these extra steps to weatherproof a chicken coop frame and reinforce it means your coop will last. These precautions might feel small, but they’ll protect your flock for years.
Customizing Your Chicken Coop Frame
Building a chicken coop isn’t just about keeping chickens safe. It’s a chance to make the coop suit your needs and style. Here are some easy custom chicken coop ideas to make the coop practical and good-looking.
Additions for Convenience
Think about what will make caring for your chickens simpler. Add storage shelves or bins to hold feed, tools, and other supplies. It’s smart to keep everything nearby, so you don’t have to hunt for gear every day.
Nesting boxes can be built right into the frame. For easy egg collection, install a door that lets you grab eggs from outside. Install a few perches inside at different heights, giving your chickens options for roosting. Make sure the perches are smooth to avoid injuries.
You might also want a pull-out droppings tray. It makes clean-ups fast and painless. A small fold-out table near the coop is handy for sorting feed or handling small tasks.
Painting and Staining: Protect Wood and Add Style
A good paint job does more than look nice. It protects the coop from rain and sun, which can wear wood down fast. Use outdoor paint or weatherproof stain for the best results.
Choose colors that suit your style. Bright colors give a cheerful look, while earth tones blend into the garden. Whatever you pick, use a paint that can handle bad weather without peeling.
For a natural look, try staining instead. A light stain shows off the wood’s natural grain while keeping it safe from rain. Keep in mind that stains need freshening up every few years to stay effective.
Roof Options: Choose What Works Best
Your roof choice matters a lot. It impacts how the coop handles rain, heat, and snow. Here’s a look at the best roof for chicken coop protection.
Tin Roof: Tin sheds rain easily and lasts a long time. It’s light and easy to install. But it can get really hot in summer, so think about adding insulation or using heat-reflective paint. Tin roofs also give a classic farm look.
Shingle Roof: Shingles are quiet in the rain and insulate well. They’re perfect if you want to keep the coop cool in summer. They do take more time to install, but they provide strong weather protection.
Polycarbonate Panels: These clear panels let in natural light, which can brighten the coop on short winter days. They’re lightweight and easy to put on, but might not handle extreme weather as well as other materials. They work best in mild climates.
Green Roof: A green roof, covered in grass or plants, is a fun and eco-friendly choice. It helps with insulation and keeps the coop cool. But it does need a little more care and upkeep to stay healthy.
These custom touches make your coop more than just a shelter. They turn it into a useful, attractive part of your yard. A well-designed coop saves you time and makes tending your flock easier.
Maintaining a Chicken Coop Frame Over Time
Taking care of your chicken coop means keeping it safe and sturdy year-round. Making a small effort today can prevent more serious problems later. Let’s break down some simple chicken coop maintenance steps.
Annual Inspections
Once a year, give your coop a close look. Start by checking for loose screws or nails. Tighten anything that’s wobbly so the frame stays solid. Look over the wood carefully—especially the base—for any signs of rot. If the wood feels soft or crumbly, it’s time to replace it.
Predators can be sneaky, so check for any damage they might have caused. Look for scratches, bite marks, or gapBy addressing these minor concerns now, larger issues can be avoided later.Don’t forget to inspect the roof for leaks or cracks.
Repairs and Reinforcements
Sometimes a quick repair is all you need. Tighten loose boards or screws, and use weatherproof nails for extra security. If you find a weak spot, add a brace or swap out the damaged wood.
Repairing a chicken coop frame doesn’t have to be complicated. If predators are a problem, reinforce those areas with sturdy metal or wire mesh. It’s always better to overbuild and keep your flock safe.
For worn-out corners or wobbly spots, add metal brackets. A little extra reinforcement can make a big difference in how long the coop lasts.
Seasonal Tips
Changing seasons can be tough on your coop. In winter, keep out drafts by sealing gaps. Insulate if you can, but keep good airflow. It’s a balancing act—warm but not stuffy. Cover any exposed screws to protect them from rust.
In summer, focus on ventilation. Open windows or vents to keep the air moving. A good breeze can make a hot day bearable for your chickens. Double-check the roof for any damage after winter storms. If your roof gets too hot, a reflective layer can help keep the coop cool.
By following these simple tips, your coop will stay strong through all kinds of weather. A little upkeep goes a long way toward protecting your chickens and keeping repairs simple.
Read More: How to Set Up a Chicken Coop: Explain Details
Frequently Asked Questions
Pressure-treated wood is a solid choice since it fights off rot and pests. Cedar is another great pick because it naturally resists bugs and moisture.
Aim for 3-4 square feet per chicken. If they roam outside often, you might manage with a little less. Space helps keep them happy and stress-free.
You’ll need a saw, hammer, drill, tape measure, and a fraEnsure to use safety gear, such as gloves and goggles. A level helps you keep things straight.
Look for a dry spot with good sunlight and wind protection. Stay away from soggy areas. Shade for summer and sun for winter make a big difference.
The right roof depends on your weather. Metal roofs, like tin, handle snow well. Asphalt shingles keep things cozy. A sloped roof helps with rain drainage. Choose what suits your climate.
Conclusion
Building a sturdy chicken coop frame takes planning, good materials, and a bit of patience. With the right tools and careful steps, you can create a coop that keeps your chickens safe and comfortable. Don’t forget to check for damage each year and make small repairs before they become big problems. A well-framed coop will last through the seasons, keeping your flock happy for years to come. Now it’s your turn to get started—your hens will thank you for it!