
Disinfecting your chicken coop is a key part of maintaining a healthy environment for your flock. How to disinfect a chicken coop may seem like a big task, but it’s really about consistency and the right tools. Regular cleaning and sanitizing can prevent health issues, like parasites and diseases, from spreading. However, doing it correctly is important. With the proper cleaning supplies, technique, and timing, you can ensure your chickens stay safe and healthy. In this post, we’ll walk you through the steps to make disinfecting your chicken coop simple and effective.
Why Disinfecting Your Chicken Coop is Essential
Cleaning and disinfecting your chicken coop is more than just a chore—it’s vital for the health of your flock. The importance of disinfecting a chicken coop goes beyond aesthetics. Over time, harmful bacteria, viruses, and pests can build up in the coop. If left unchecked, these can lead to serious health issues and even death in your chickens. Regularly disinfecting helps to prevent diseases in chickens, keeping your flock healthy and happy.
When you disinfect, you’re not only removing visible dirt but also germs that can cause illness. A clean coop reduces the chances of respiratory infections, parasites, and other diseases that spread quickly in dirty spaces. It’s also a beneficial way to lower stress in your chickens, which helps them stay productive and lay eggs regularly.
Proper sanitation also keeps pests like rodents and flies at bay. These pests carry harmful bacteria that can further harm your chickens. By disinfecting often, you create a cleaner, healthier environment for your flock to thrive.
When to Disinfect a Chicken Coop
When it comes to how often to disinfect a chicken coop, there’s no one-size-fits-all answer. It really depends on your flock and their environment. Generally speaking, you should aim to deeply clean and disinfect your coop at least every 3–6 months. This helps keep harmful bacteria and parasites at bay.
However, daily or weekly spot cleaning is just as important. Removing droppings and replacing bedding often will help keep the coop tidy between deep cleanings. You might need to disinfect more often during certain times, like when your chickens are molting or if you introduce new birds. This helps prevent disease and keeps everyone healthy.
If your chickens get sick or you notice pests like mites, disinfecting immediately is key. The more often you disinfect, the less likely germs and parasites are to stick around. A clean coop equals healthier chickens.
Remove all the chickens and their belongings.
Before you start cleaning, you need to remove chickens and belongings before cleaning the coop. This keeps your chickens safe and makes cleaning easier. First, carefully move your chickens to a safe space. A temporary pen or a separate area works best.
Next, remove all items from the coop. This includes feeders, waterers, perches, and nesting boxes. These items collect waste and germs, so clean them well before putting them back.
Also, remove any bedding, like straw or wood shavings, because it can be full of bacteria. Once everything is cleared out, you’re ready to clean and disinfect the coop properly.
Scrape and remove debris.
Once you’ve removed all the chickens and their belongings, it’s time to tackle removing debris from the chicken coop. Start by scraping away any waste that’s built up. This includes manure, old bedding, feathers, and leftover food. Use a shovel or scraper to clear the floors, walls, and corners. Make sure to check under perches and in nesting boxes, as those are common spots for debris to pile up.
Removing debris is important because it can hide bacteria, parasites, and pests that might harm your chickens. After scraping everything clean, dispose of it properly. Don’t leave it near the coop—it can attract pests back. With the debris gone, the coop will be ready for disinfecting, and your chickens will have a healthier, cleaner space.
Clean surfaces with soap and water.
After clearing out the debris, the next step is cleaning surfaces in the chicken coop. Use warm water and soap to scrub down all surfaces, like the walls, floors, and nesting boxes. Soap breaks down dirt, waste, and grease, making the cleaning process easier. It also helps remove any lingering bacteria that could affect your chickens’ health.
A stiff brush is your best friend for scrubbing those tough spots. Be sure to hit all the nooks and crannies, especially corners where waste tends to build up. Scrubbing should be followed by a thorough rinsing with clean water. Leftover soap can irritate your chickens’ skin, so make sure it’s all washed away.
Cleaning your coop well helps prevent pests, like mites, and keeps the environment healthier for your chickens.
Apply a disinfectant to the coop.
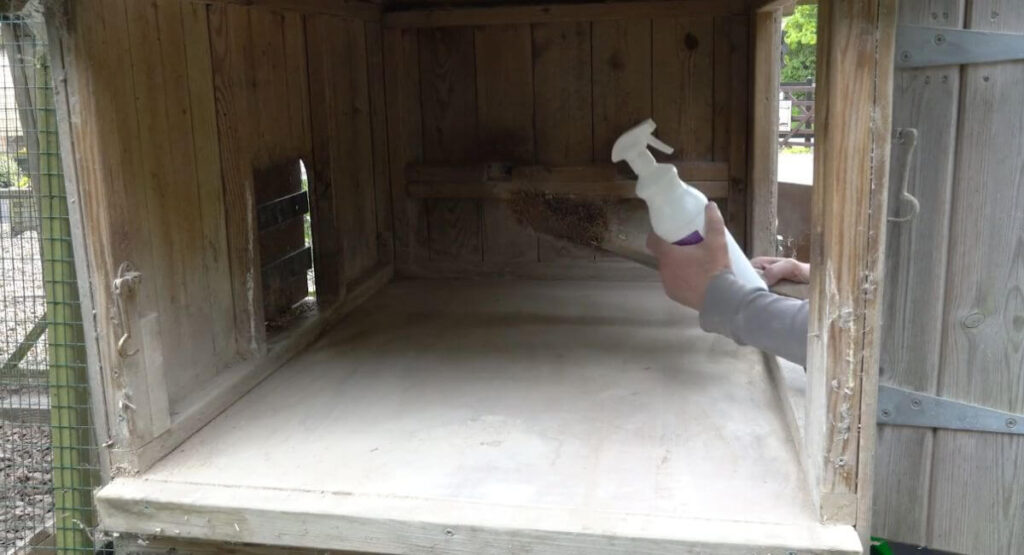
Once the coop is clean, it’s time to apply a disinfectant. Choosing the best disinfectant for a chicken coop is key to preventing illness. Look for a product designed for poultry environments. This will help kill harmful bacteria, viruses, and parasites. Natural, non-toxic disinfectants are a safer option, especially if you’re concerned about how to disinfect a chicken coop safely.
Mix the disinfectant according to the instructions. It frequently requires diluting with water. Then, apply it generously to all surfaces, including floors, walls, roosting bars, and nesting boxes. Make sure every part of the coop is covered.
Let the disinfectant sit for the recommended amount of time—usually about 10–15 minutes. After that, wipe down the surfaces with a clean cloth or towel. Once the coop is dry, you’re ready to bring your chickens back in.
By choosing the right disinfectant and applying it carefully, you’ll keep your chickens healthy and your coop clean.
Disinfect the chicken coop’s accessories.
After cleaning your chicken coop, it’s time to apply a disinfectant. Choosing the best disinfectant for a chicken coop is important for keeping your flock safe and healthy. Look for a product that’s specifically made for poultry. Natural, non-toxic options are excellent if you want to avoid harsh chemicals.
To apply, follow the product’s instructions carefully. Usually, this means mixing the disinfectant with water in the right ratio. Spray or wipe the disinfectant on all surfaces, including the floors, walls, and roosting bars.
Let the disinfectant sit for the recommended time—usually about 10–15 minutes. Then, wipe everything down with a clean cloth to remove any excess. Make sure the coop is dry before bringing your chickens back in.
By using the right disinfectant and following these steps, you’re ensuring a clean, safe environment for your birds.
Dry and Reassemble the Coop
Once you’ve finished disinfecting the chicken coop, it’s time to focus on drying and reassembling. Drying the chicken coop after cleaning is just as important as the cleaning itself. A damp coop invites mold, mildew, and pests, all of which can harm your chickens.
First, let the coop air dry for several hours. If the weather is pleasant, open the windows and doors. The drying process will be accelerated by sunlight and fresh air. On rainy or cold days, use a fan to dry out the space faster.
Make sure all surfaces, especially bedding areas, are completely dry before reassembling. Once everything is dry, replace the bedding with fresh straw or wood shavings. Then, reassemble any items you removed, like nesting boxes or feeders.
Your coop should now be dry, clean, and ready for your chickens. This final step ensures that your flock has a safe and comfortable place to live.
Reintroduce the bedding and add fresh accessories.
Once your chicken coop is dry and reassembled, it’s time to add fresh bedding. Adding bedding to the chicken coop is an important step for both comfort and hygiene. Fresh bedding absorbs moisture, controls odors, and gives your chickens a soft place to lay eggs and rest.
When adding fresh bedding to the chicken coop, choose a material that works best for your setup. Straw, hay, and wood shavings are popular choices. These materials are absorbent and simple to replace when needed.
Spread the bedding evenly across the floor of the coop. A layer about 3 to 4 inches deep is ideal. This helps to keep everything clean and absorb moisture effectively.
Don’t forget to add bedding to the nesting boxes too. This will encourage your hens to lay eggs in a clean and comfortable spot.
Now’s also a suitable time to check on other accessories, like feeders and waterers. Your chickens need fresh food, so clean and refill them.
With fresh bedding in place, your chickens will have a cozy and clean environment to thrive in.
Maintenance and Ongoing Disinfection Tips
Regular maintenance of your chicken coop is essential to keep your flock healthy and happy. Clean and safe living spaces help prevent diseases and pests. Ongoing chicken coop maintenance is a simple way to ensure your chickens thrive.
First, let’s talk about how often to disinfect your chicken coop. You should disinfect the coop thoroughly about every 3 to 4 months. This deep cleaning removes built-up dirt and bacteria. However, smaller cleaning tasks should happen weekly. Remove droppings, uneaten food, and soiled bedding to keep things fresh.
Keep an eye on the coop itself. Check the roof, doors, and windows for any damage. If there are cracks or gaps, seal them up to avoid drafts or pests. Healthy chickens thrive in a well-maintained coop.
During your monthly deep clean, strip the bedding completely and disinfect all surfaces. Pay attention to perches, nesting boxes, and the coop floor. Regularly doing this helps keep harmful bacteria and viruses from spreading.
If you notice any health issues with your flock, it could be a sign that the coop needs more attention. Stress or illness can often be traced back to a dirty environment.
Remember to always use a safe disinfectant when cleaning. It’s important to choose something non-toxic, so your chickens are safe.
By staying on top of ongoing chicken coop maintenance, you’ll keep your hens comfortable and healthy. They’ll reward you with fresh eggs and lots of joy in return.
Additional Tips for a Healthier Coop
The health of your chickens depends on the cleanliness of your coop. But it’s also about making their space more comfortable. Here are a few healthy chicken coop tips to help you maintain a safe and joyful environment.
- Proper Ventilation is Essential: Chickens need fresh air. A well-ventilated coop helps keep moisture and ammonia levels low. Just make sure there are no drafts, especially in winter.
- Dry bedding is a must: Wet bedding can cause bacteria and mold. When maintaining a clean chicken coop, always check the bedding. Replace it when it gets soiled or wet to keep the coop fresh.
- Consider sand or diatomaceous earth: Sand helps absorb moisture and keep bedding dry. You can also use food-grade diatomaceous earth to control pests naturally. It works well for preventing mites and lice.
- Regularly Check for Pests: Inspect your coop for pests like mites, lice, and rodents. These can harm your chickens and spread disease. Deal with any infestations right away.
- Feed Your Chickens Right: A nutritious diet is key. Provide fresh water and high-quality feed daily. Healthy chickens are more resilient and easier to care for, which makes cleaning your chicken coop easier too.
- Watch the Temperature: Too much heat or cold can stress your chickens. In winter, add extra bedding for warmth. During the summer, provide shade and airflow to keep them cool.
- Add Enrichment to the Coop: Chickens get bored, just like us. Hang some vegetables or add perches to keep them active. This helps prevent stress and encourages healthier behavior.
By following these healthy chicken coop tips, you’ll provide a cleaner, safer space for your chickens. Happy chickens lead to happier egg-laying and a cleaner coop overall.
Conclusion
A clean chicken coop is vital for your flock’s health. In this post, we explain how to disinfect a chicken coop the right way. Start by removing all chickens and their belongings. Next, scrape and remove debris, clearing out waste and leftover bedding. Then, clean surfaces with soap and water. After that, apply a disinfectant that’s both effective and safe for your chickens. Let everything dry thoroughly before putting the coop back together. Finally, add fresh bedding and accessories to keep the space clean. Regular ongoing chicken coop maintenance will ensure a healthy home for your chickens and prevent disease.
FAQs
Disinfecting your coop is essential to keep harmful bacteria, parasites, and diseases at bay. It’s key to maintaining healthy chickens.
Aim to disinfect every 3 to 6 months, or more often if the coop gets very dirty or chickens get sick.
Use a poultry-safe cleaner, like diluted bleach or vinegar, to disinfect your coop safely and effectively.
It’s best to remove your chickens during cleaning. This keeps them safe from chemicals and allows for a thorough job.
Let the coop air dry by opening doors and windows. Fans are another tool you can use to expedite drying.