
Building chicken nesting boxes doesn’t have to be complicated or costly. Learning how to build chicken nesting boxes yourself can save money and give you control over the design. A well-made nesting box helps keep eggs clean, hens comfortable, and your coop organized. Whether you’re just starting out or looking to upgrade, this guide walks you through each step with clear instructions. By the end, you’ll know how to build boxes that work well for your flock and fit your coop perfectly. Let’s get started.
Why Nesting Boxes Are Important
Nesting boxes aren’t just a nice addition to your coop—they’re essential for happy hens and clean, safe eggs. Here’s why:
Encouraging Egg Laying
Hens need a quiet, private space to lay their eggs. Without nesting boxes, they’ll lay them anywhere—on the coop floor, in the yard, or under bushes. This can make finding eggs a daily scavenger hunt. Nesting boxes provide a reliable, comfortable space where hens feel secure, making egg-laying predictable and efficient.
Hygiene and Egg Protection
Eggs laid in the wrong spots can get dirty, cracked, or even contaminated. Nesting boxes help keep eggs clean and safe. With soft bedding like straw or wood shavings, the boxes cushion eggs and prevent breakage. They also make it harder for eggs to get stepped on or pecked by curious hens.
Reducing Stress in Chickens
Chickens don’t like fighting for space. If there aren’t enough nesting boxes, hens will compete for spots, leading to stress and squabbles. Stress affects egg production and can harm their health. Providing enough boxes ensures every hen has a peaceful, secure place to lay her eggs, which keeps everyone calmer.
Nesting boxes make life easier for you, too. They save time, keep eggs cleaner, and help your coop stay organized. A little effort upfront creates a better setup for you and your flock.
Key Considerations Before Building Chicken Nesting Boxes
Planning is key when building nesting boxes. A well-thought-out design keeps your hens comfortable, protects eggs, and keeps your coop organized.
Number of Boxes Needed
You’ll need one nesting box for every 4-5 hens. This ratio works well to prevent overcrowding and competition. Too few boxes can lead to stress and fighting, while too many waste valuable coop space. For larger flocks, this simple rule ensures every hen has access to a nesting spot when she needs it.
Ideal Size
Size matters when it comes to nesting boxes. For standard breeds like Rhode Island Reds or Leghorns, boxes should be 12 inches wide, tall, and deep. Larger breeds, such as Orpingtons or Brahmas, need more room—around 14 to 16 inches per dimension. A good box lets a hen turn around comfortably while feeling snug enough to feel safe.
Materials to Use
Select materials that are safe, strong, and easy to clean. Wood is a classic option, but make sure it’s untreated to avoid harmful chemicals. Plastic works too, especially for its lightweight and washable surface. Avoid anything that can splinter or trap moisture, like old, untreated pallets or rusty metal, which can harm hens and attract pests.
Placement in the Coop
Location is just as important as the design. Place boxes in a quiet, low-traffic area of the coop to give hens privacy. They should be slightly elevated—12 to 24 inches off the ground—to keep them away from dirt, pests, and debris. Make sure they aren’t too high, though, as hens can hurt themselves jumping down. Pick a shaded spot to keep the boxes cool and inviting.
Ventilation and Accessibility
Good airflow keeps nesting boxes dry and odor-free. Avoid putting them in areas where drafts blow directly into the boxes. Easy access is also crucial. Hens should be able to get in and out without trouble, and you need to collect eggs without crawling into the coop. Adding a hinged lid or an open front makes cleaning and egg gathering simple.
With careful planning, your nesting boxes will keep your hens happy, your eggs clean, and your coop running smoothly.
Materials and Tools Needed
Building chicken nesting boxes doesn’t require fancy materials or tools, but a little preparation goes a long way. Here’s what you’ll need:
Materials
Wood: Plywood or untreated lumber works best. Treated wood should be avoided since it can contain harmful chemicals.
Screws and Nails: Essential for keeping the boxes sturdy. Screws are easier to adjust if you need to make changes.
Hinges: If you’re adding lids for easier cleaning or egg collection, hinges make the process simple and secure.
Bedding Materials: Straw, hay, or wood shavings are key for cushioning eggs and making the boxes cozy for hens. Choose clean, dry materials.
Optional: Non-toxic paint or sealant can protect the wood from moisture, extending the life of your boxes.
Tools
Saw: For cutting wood to the right dimensions. A circular saw is faster, but a handsaw works fine for smaller jobs.
Drill: A cordless drill will save you time and effort when assembling the boxes.
Hammer: Handy for nails and any adjustments during construction.
Measuring Tape: Accurate measurements are critical to ensure the boxes fit your coop and your hens.
Sandpaper: Smooth out edges to prevent splinters, making the boxes safe for both hens and you.
Pencil and Square: Helpful for marking wood and ensuring your cuts are straight and precise.
Cost Breakdown
Building your own nesting boxes is often more affordable than buying pre-made ones. Here’s a rough estimate:
DIY Costs:
Wood: $10–$20 per box (cheaper if you use scraps or repurposed materials).
Screws and Nails: $5–$10.
Hinges: $5–$10.
Bedding: $5–$10 per bale or bag.
Total DIY Cost: Around $25–$50 per box.
Pre-Made Costs:
Single Box: $30–$50.
Multi-Box Units: $75–$200+.
Pre-made boxes are convenient, but they can be expensive and lack customization. Building your own lets you tailor the boxes to fit your hens and your coop.
Budget-Friendly Tips
Repurpose items like old crates or buckets for nesting boxes.
Check online marketplaces or salvage yards for free or low-cost materials.
Borrow tools from friends or neighbors to save on upfront costs.
With a few basic supplies and tools, you can create sturdy, comfortable nesting boxes that meet your flock’s needs without overspending.
Step-by-Step Guide to Building a Chicken Nesting Box
Making chicken nesting boxes is simple. With the right approach, you can create something practical, durable, and perfectly suited to your hens. Here’s how:
Step 1: Plan Your Design
First, think about the size and number of boxes your flock will need. Standard breeds typically require a 12x12x12-inch box, while larger breeds might need extra space. Consider features like a sloped roof to keep hens from roosting on top or a hinged lid for easy cleaning. A quick sketch can help you visualize the final product and prevent mistakes later.
Step 2: Prepare Your Materials
Gather your materials: wood, screws, nails, hinges, and bedding. Make sure the wood is untreated to avoid exposing your hens to harmful chemicals. Cut everything to size according to your plan, and sand down rough edges to avoid splinters. Double-check your measurements before you start assembling.
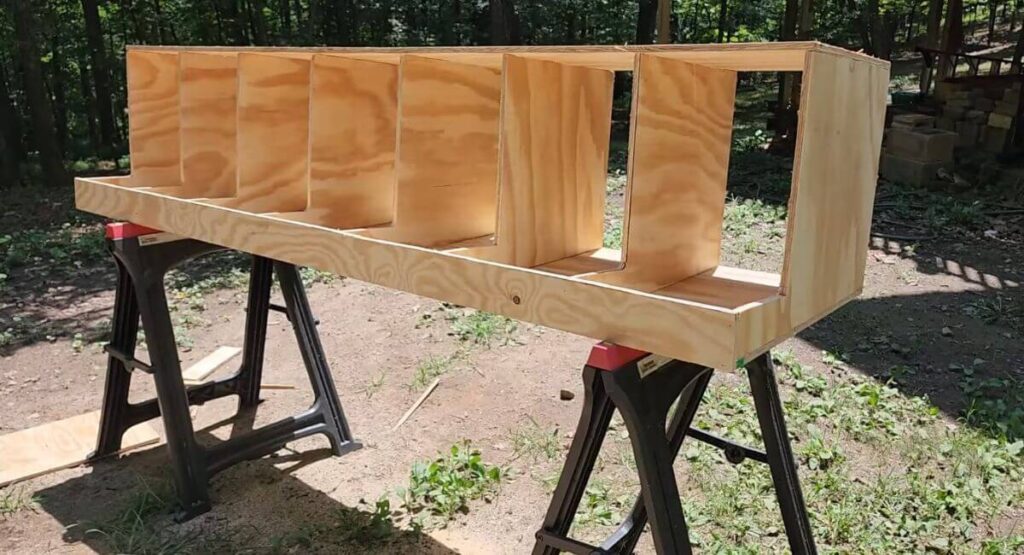
Step 3: Assemble the Box
Start by constructing the frame. Attach the sides, back, and bottom with screws or nails. Add the front panel, leaving a small lip (about four inches high) to keep bedding inside but still allow hens to enter comfortably. Reinforce the corners to ensure the box is sturdy.
Step 4: Add a Sloped Roof (Optional)
A sloped roof prevents hens from perching on top and keeps the box cleaner. It’s an optional step but a good idea if roosting is an issue. Attach the roof at an angle using screws or hinges if you want it to open for cleaning.
Step 5: Install the Box in the Coop
Find a quiet, shaded area in the coop for your nesting box. Position it off the ground, around 12 to 24 inches high, to keep it clean and deter pests. Attach it securely to prevent tipping, and make sure it’s easy for you to access for egg collection and cleaning.
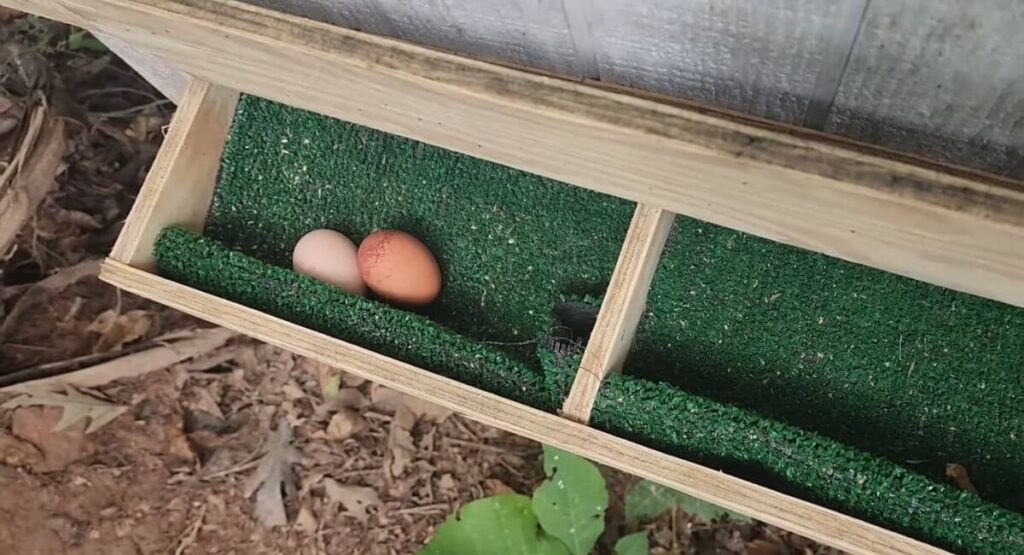
Step 6: Add Bedding Material
Line the box with soft, clean bedding such as straw or wood shavings. This not only cushions the eggs but also keeps the box warm and inviting for your hens. Change the bedding often to keep it clean and reduce smells.
A Few Extra Tips
Introduce Boxes Early: Place them in the coop before your hens start laying so they know where to go.
Use a Fake Egg: If your hens seem unsure, a ceramic or wooden egg can encourage them to use the boxes.
Keep an Eye on Usage: Check regularly to ensure the boxes are clean and your hens are using them as intended.
With a little planning and effort, you’ll have nesting boxes that your hens will love—and that make collecting eggs a breeze.
Common Mistakes to Avoid
Even with the best plans, small missteps can cause big problems. Here are some strategies to avoid the most common mistake:
1. Incorrect Dimensions
Size matters when building nesting boxes. If they’re too small, hens will feel cramped and might refuse to use them. For most breeds, a 12x12x12-inch box works well, but larger hens, like Brahmas, might need 14 inches or more. Oversized boxes, though, can attract multiple hens, which often leads to broken eggs and stress. Tailoring the size to your flock is key.
2. Poor Placement
Hens need peace and quiet to lay eggs. Placing boxes near doors, feeders, or busy coop areas is a recipe for stressed chickens. Loud noises and constant movement discourage hens from using the boxes. Choose a quiet, shaded area away from the hustle, and your hens will thank you.
3. Skipping Cleaning and Maintenance
Dirty nesting boxes are a problem waiting to happen. They attract pests, spread disease, and make hens avoid the space altogether. Regularly clean out soiled bedding and replace it with fresh material. Check for loose screws, splinters, or other hazards that might harm your flock. A weekly cleaning routine keeps everyone healthy.
4. Not Enough Boxes
Hens don’t like to share. A shortage of boxes can lead to fights, stress, and broken eggs. Plan for at least one box per 4-5 hens, and keep an eye on your flock. If you notice squabbles or overcrowding, it’s time to add a few more.
5. Hard-to-Reach Boxes
If a nesting box is too high or difficult to reach, hens may decide it’s not worth the effort. Keep boxes between 12 and 24 inches off the ground and add a ramp if needed. Also, ensure they’re easy for you to access. Hinged lids or removable panels make cleaning and egg collection simple.
6. No Bedding or the Wrong Kind
A bare nesting box is uncomfortable and increases the risk of broken eggs. Always add soft, clean bedding like straw or wood shavings. Avoid sawdust, which can irritate chickens’ lungs, or damp materials that could grow mold.
By avoiding these mistakes, you’ll create a stress-free environment for your hens and a smoother egg-laying process for your flock. Putting in a little effort now can save you a lot of trouble later.
Maintenance Tips for Nesting Boxes
Taking care of your nesting boxes doesn’t have to be complicated. A little attention goes a long way in keeping your hens happy and their eggs clean. Here’s how to do it:
1. Clean Regularly
Dirty nesting boxes are a recipe for trouble. Left uncleaned, they attract pests, smell bad, and discourage hens from using them. Set a schedule to clean out old bedding once a week. Brush away debris and wipe the surfaces with a mild, safe cleaner. If you notice dirty eggs or droppings piling up, it’s time to clean more often.
2. Watch for Wear and Tear
Nesting boxes take a lot of daily use, so keep an eye out for damage. Loose nails, splinters, or cracked plastic can hurt your hens. As soon as you notice these problems, fix them. Fixing something quickly can stop bigger problems later.
3. Keep Pests at Bay
Nesting boxes can attract mites, lice, or other pests if not maintained. Sprinkle diatomaceous earth in the bedding as a preventive measure. Check for signs of infestation, like restless hens or tiny specks moving in the bedding. Catching pests early is easier than dealing with a full-blown outbreak.
4. Replace Bedding Often
Fresh bedding makes a huge difference. Damp or soiled materials can lead to mold, bacteria, and unhealthy conditions for your hens. Stick with straw or wood shavings that are clean and dry. Avoid anything dusty or damp that could irritate your flock.
5. Make Egg Collection Easy
Don’t let eggs sit in the boxes too long. Collect them at least twice a day to keep the boxes clean and discourage pecking. If eggs get broken, clean the mess immediately to prevent hens from developing bad habits.
6. Deep Clean Seasonally
Twice a year, give your nesting boxes a thorough deep clean. Remove all bedding, scrub the surfaces with warm, soapy water, and let everything dry completely. This step is especially important before winter when dampness can cause bigger issues.
7. Check the Box Placement
Sometimes, environmental changes mean you need to adjust the box location. Ensure the boxes remain in a quiet, shaded part of the coop, away from drafts or direct sunlight. If hens seem reluctant to use them, placement could be the problem.
8. Rotate Boxes
If you have enough boxes, consider resting one or two at a time. This gives you a chance to deep clean and air them out while the others remain in use. It’s a simple way to maintain hygiene without disrupting your flock.
With just a few steps, you can keep your nesting boxes in great shape and your hens laying happily. Clean boxes mean healthy chickens—and better eggs.
Read More: Where to Put a Chicken Coop: The Ultimate Guide
Creative and Budget-Friendly Ideas
Creative and Budget-Friendly Ideas for Chicken Nesting Boxes
Building nesting boxes doesn’t need to be expensive. With a bit of creativity and resourcefulness, you can create cozy spaces for your hens on a budget. Here are some easy and affordable ideas:
1. Repurpose Household Items
Take a look around your home. Old wooden crates, drawers, or plastic bins can be turned into nesting boxes. Simply add bedding and modify it to suit your hens. These upcycled items are free or low-cost and can work well for creating a comfortable nesting space.
2. Use Buckets
Five-gallon buckets are a practical and cheap option for nesting boxes. You can find them easily, and they’re simple to modify. Turn the bucket on its side, secure it in place, and fill it with bedding. It’s a quick and cost-effective way to make a functional box.
3. Wooden Pallets
You can often get wooden pallets for free or at a very low cost. Break them down to create sturdy nesting boxes. With a bit of work, you can make several boxes from one pallet, reducing both cost and waste. Plus, the natural look fits perfectly with a rustic coop.
4. Milk Crates
Milk crates are another affordable option. They are strong, simple to clean, and can be stacked. Place one crate in a quiet area of the coop, add bedding, and your hens will have a ready-to-go nesting space. You can find milk crates cheaply at secondhand stores or online.
5. Old Furniture
An old bookshelf or cabinet can be repurposed into multiple nesting boxes. Remove the drawers or shelves, add dividers, and line them with bedding. You’ll have a stylish, multi-functional piece for your coop without spending much money.
6. Cardboard Boxes
If you’re in a pinch, sturdy cardboard boxes can work for a short-term solution. Choose boxes large enough for your hens, line them with bedding, and you’re all set. They won’t last forever, but they’re a great temporary option when you need to get started quickly.
7. PVC Pipes
Large PVC pipes make excellent nesting spots. Cut them to size, place them in your coop, and fill them with bedding. Their smooth surface makes cleaning easy, and their shape mimics a natural nesting environment for your chickens.
8. DIY Divider Systems
For larger boxes or crates, create dividers to turn one space into several smaller, individual boxes. You can use scrap wood, cardboard, or plastic to create partitions. This way, your hens can each have their own private space, and you’ll maximize your materials.
9. Add Personal Touches
If you enjoy a little DIY fun, decorate your nesting boxes. Use non-toxic paint to add color or stencils for a fun design. Just remember that comfort comes first, so don’t let decorations interfere with the box’s function.
10. Look for Free Materials
Check local community groups for free or low-cost materials. Sometimes people offer pallets, crates, or other useful items for free. It’s worth checking online marketplaces or community boards to find affordable supplies.
By using items you already have or finding affordable materials, you can create nesting boxes that are both practical and easy on your wallet. Your hens will appreciate having a cozy space, and you’ll feel great about saving money and recycling materials.
Read More: How Many Nesting Boxes Per Chicken? Essential Tips for Happy Hens and Maximum Egg Production
Conclusion
Making chicken nesting boxes is simple. With a little planning and the right materials, you can create a comfortable space for your hens to lay eggs. By following the steps in this guide, you’ll ensure your chickens have a clean, quiet, and private spot that reduces stress and encourages egg-laying. Whether you’re building from scratch or using creative, budget-friendly ideas, the effort will pay off with happier, healthier chickens. With the right nesting boxes in place, your hens will feel right at home in the coop.
FAQs about How to Build Chicken Nesting Boxes
Use sturdy, non-toxic materials like wood or plastic. These materials are safe for your chickens and easy to clean.
Ideally, provide one box for every 4 to 5 hens. This ensures there’s enough space for everyone to lay eggs comfortably.
Put the boxes in a quiet, shaded area away from busy spots. Elevating them a little makes it easier for your hens to access.
Absolutely! You can use recycled materials like old crates or wooden pallets to make affordable, functional nesting boxes.
Clean the boxes weekly to maintain hygiene. Change the bedding regularly to keep everything fresh and your hens healthy.