
A well-built chicken coop roof isn’t just a nice-to-have—it’s essential. Knowing how to build a chicken coop roof that’s sturdy and protective keeps your chickens safe from harsh weather and local predators. A roof isn’t only about comfort; it’s about giving your birds a secure, dry space to thrive. In this guide, I’ll take you through each step, from selecting the right materials to putting the structure together. Whether you’re a seasoned DIYer or just getting started, I’ll show you how to make a roof that stands up to anything nature throws at it.
Why a Good Chicken Coop Roof Matters
A strong chicken coop roof is more than a finishing touch—it’s what keeps your birds safe and healthy. The chicken coop roof benefits are huge. A well-built roof protects chickens from rain, snow, sun, and even predators who may try to reach them from above.
A solid roof helps create a weatherproof chicken coop, which is key for keeping your birds comfortable. Rain and snow can lead to big problems inside the coop. When moisture gets in, it can cause rot and mold, turning the coop into a breeding ground for bacteria. A roof that’s built well and angled right will keep the interior dry and secure.
A sturdy roof also helps regulate temperature inside the coop. It blocks summer heat and keeps warmth in during the winter, creating a more stable environment for your flock. Less stress means healthier chickens, and healthy chickens are likely to lay more eggs. When you plan your coop, think carefully about the roof—it’s a straightforward way to invest in your chickens’ well-being.
Choosing the right roof design for your coop
Choosing the best roof for a chicken coop isn’t just about looks. The right chicken coop roof design keeps your chickens dry, gives them fresh air, and protects them from the elements. Here’s a look at some popular chicken coop roof styles to help you decide.
Flat Roof
A flat roof is simple to build and works well in places with mild weather. But it’s not great for heavy rain or snow. Flat roofs don’t shed water easily, which can lead to leaks or puddling over time. If you live in a dry area or have a small coop, this style might work.
Sloped Roof
A sloped roof, also called a shed roof, has a single angled side that helps water and snow slide off. It’s a practical choice for rainy or snowy climates, where you need that water runoff. Plus, the slant gives you height variation that can help improve airflow inside.
Gable Roof
The gable roof, or A-frame, is one of the best roof styles for chicken coops in all-around protection. With two angled sides, it quickly sheds rain and snow and gives the coop added height for ventilation. That extra room is perfect for adding windows or vents to keep air moving and reduce odor buildup.
Lean-To Roof
A lean-to roof is similar to a sloped roof but attached to another structure, like a barn or shed. This design saves space and materials, making it ideal if you’re short on either. It also benefits from the extra shelter of a nearby building, keeping the coop cozier.
Each of these roof designs has something to offer, but the best choice depends on your weather, coop size, and flock needs. Whatever you pick, aim for a roof that’s sturdy, weather-resistant, and simple to ventilate—your chickens will thank you.
Selecting Roofing Materials
Choosing the best material for a chicken coop roof is about finding something that’s sturdy, weatherproof, and simple to maintain. Here’s a breakdown of common chicken coop roof materials so you can decide what’s right for your setup.
Corrugated Metal
Corrugated metal is a favorite because it’s tough and long-lasting. It’s ideal for a durable coop roof that can handle all kinds of weather. Metal roofing lets rain and snow slide off easily, which helps prevent leaks and pooling. But keep in mind that metal roofs get hot in the summer, so good ventilation is a must. Metal is budget-friendly and doesn’t need much upkeep, which is a win-win.
Asphalt Shingles
Asphalt shingles are simple to find and install. They provide excellent insulation, which helps keep your coop at a steady temperature. Asphalt is also pretty durable, though it may not last as long as metal. In humid climates, shingles might wear out sooner, so they may need replacement over time. For a weather-resistant and affordable option, shingles are a viable choice.
Plywood with waterproof paint
If you’re up for a DIY approach, plywood with waterproof paint or sealant works well. This material is flexible and cost-effective, especially for smaller coops. Painted plywood lets you match the roof to the rest of your setup and provides decent water resistance when sealed properly. Just know that it’ll need regular maintenance to stay weatherproof.
Polycarbonate Panels
Polycarbonate panels are lightweight and durable, and they let light into the coop, which is helpful during the winter months. They’re weatherproof and impact-resistant, providing solid protection from rain and snow. Polycarbonate can be a bit pricier, though, and may need some extra support in heavy snowfall.
Reclaimed Materials
Reclaimed materials, like salvaged metal or recycled shingles, are budget-friendly and sustainable. They add character to the coop, but you’ll want to check their durability. Older materials may need reinforcement to hold up well over time. If you’re looking to save money and reduce waste, reclaimed materials can be a beneficial pick.
The best material for your chicken coop roof depends on your weather, coop size, and budget. Whatever you choose, make sure it’s sturdy, simple to maintain, and offers excellent insulation. The right roof keeps your chickens comfortable and safe, season after season.
Essential tools and supplies
Building a chicken coop roof requires some essential tools and supplies. Having the right gear can make your project smoother and safer. Here’s a list of the tools for a chicken coop roof and the chicken coop roof supplies you’ll need.
Measurement tape and Carpenter’s Square
First up is a measuring tape. It helps you size your materials correctly. A carpenter’s square ensures you make straight, even cuts. Both tools are key for accuracy.
Saw (Circular or Hand Saw)
Next, you’ll need a saw to cut your roofing materials. A circular saw is quick and efficient, but a hand saw works well for smaller projects. Both will get the job done for your chicken coop roof DIY.
Drill and Drill Bits
A power drill is a must-have tool. You’ll use it for fastening screws and assembling parts of the roof. Make sure to have different drill bits ready. Some areas may need pilot holes to prevent wood from splitting.
Screws, nails, and fasteners
You’ll need secure fasteners to hold your roof together. Galvanized screws and nails resist rust, keeping your roof strong and secure. These chicken coop roof supplies will help ensure it stands up to the elements.
Hammer
A hammer is another handy tool. It’s perfect for simpler tasks, like securing nails. You can also use it to adjust pieces if something doesn’t fit right.
A ladder or step stool
Safety is important, especially when working up high. A sturdy ladder or step stool is essential for reaching your roof safely. Make sure it’s stable and the right height for your coop.
Safety Gear (Gloves, Goggles, and Dust Mask)
Always prioritize safety when working on any project. Wear protective gloves to avoid splinters and sharp edges. Goggles will shield your eyes from dust and debris, while a dust mask keeps you from inhaling particles.
Roofing Materials
Your choice of roofing materials depends on the style you’re building. Common chicken coop roof supplies include metal sheets, asphalt shingles, or waterproof paint. Have your materials pre-cut or ready to install based on your design.
The caulking gun and sealant
To keep your coop fully weatherproof, a caulking gun and sealant are key. Use the sealant around joints and edges to prevent leaks. This extra layer of protection is important for keeping the inside dry.
Optional: Tarp or Temporary Cover
If the weather looks uncertain, consider using a tarp. It protects your materials from sudden rain while you work. A tarp is also helpful if you need to pause the project and keep everything dry.
With these chicken coop roof DIY tools and supplies, you’ll be ready to build a strong, durable roof. Being prepared will help ensure your chickens stay safe and comfortable all year long.
Step-by-Step Guide to Building the Chicken Coop Roof
With your tools and materials ready, it’s time to dive into the project. This step-by-step guide will help you build a chicken coop roof that’s sturdy and functional. Let’s get started!
Step 1: Measure and Cut Roof Supports
Start by measuring your chickencoop. Knowing the dimensions will guide your cuts. Decide on the pitch of your roof, as this affects the support angle. Use your measuring tape and carpenter’s square to mark the cuts. Once marked, grab your saw and cut the roof supports. Ensure that every piece is level and aligned. This step is vital for establishing a solid base.
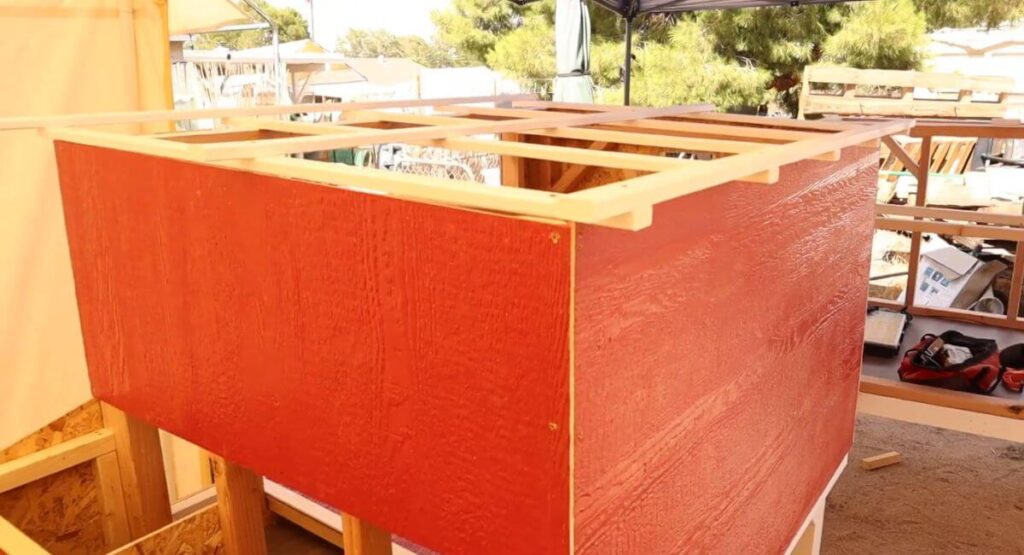
Step 2: Install Roofing Framework
Next, install the roofing framework. Secure the cut supports to the top of the coop using screws or nails. Check that everything is level and evenly spaced. This framework is essential because it will support the roof material. For added stability, consider adding cross braces. A solid framework makes for a reliable chicken coop roof installation that can withstand weather changes.
Step 3: Install Roofing Material
Now, it’s time to put on the roofing material. If you’re using metal sheets, start at the bottom and work your way up. Overlap each sheet to ensure proper coverage. If you’ve chosen shingles, begin at the base and nail each piece securely. Take care during this step; proper installation prevents leaks and keeps your chickens dry. A weatherproof chicken coop is key for your flock’s comfort.
Step 4: Add finishing touches
Finally, add the finishing touches. Trim any edges that hang over for a neat look. If you used shingles, apply roofing cement along the edges. This extra step helps prevent leaks. Check the seams and joints carefully; adding sealant can provide extra protection. At the peak of the roof, install a ridge cap to cover any joints. This detail gives your coop a polished appearance.
By following this DIY chicken coop roof guide, you’ll create a reliable roof. Your chickens will be safe from rain, snow, and sun. With careful planning and execution, you’ll have a roof that lasts for years.
Common Mistakes to Avoid When Building a Chicken Coop Roof
Building a chicken coop roof is an exciting project. However, it’s simple to make mistakes that could lead to problems later. Here are some common chicken coop roof mistakes you should watch for, along with helpful chicken coop roof tips to keep your project on track.
Poor Measurements
One of the biggest errors is miscalculating dimensions. It can be frustrating when your cuts don’t line up properly. Always double-check your measurements before cutting. Accurate measurements help you avoid coop roof problems down the line.
Skipping the Framework.
Some people think they can skip the roofing framework to save time. This can cause your roof to sag or become unstable. A solid framework is essential for supporting the roofing material. It also helps prevent leaks and increases durability.
Using the wrong materials
Not all roofing materials are suitable for chicken coops. Choosing materials that can’t withstand weather can lead to quick damage. It’s best to select durable, weatherproof options. This choice will help you avoid costly repairs later.
Ignoring Ventilation
Many builders forget about ventilation when designing their roofs. Good airflow is essential to keep the coop dry. Without it, you may end up with a damp setting. Incorporate vents into your roof design to promote airflow and avoid coop roof problems.
Neglecting Waterproofing
Failing to waterproof your roof can be a major mistake. Even the best materials can leak if seams aren’t sealed properly. Use appropriate sealants to ensure your roof is watertight. This step is essential for keeping your chickens dry and comfortable.
Inadequate Overhang
Not allowing enough overhang on your roof can lead to water running down the sides of your coop. A roof that doesn’t extend far enough can cause leaks. Make sure your roof has a sufficient overhang to direct rainwater away from the walls.
Rushing the installation.
It’s tempting to rush through the installation and finish it quickly. However, this can lead to mistakes, like uneven cuts or loose materials. Take your time with each step. Careful installation is key to preventing future problems.
Not considering Snow Load
In regions with heavy snowfall, it’s essential to consider the weight of snow buildup. A roof that can’t support snow can collapse under its weight. Ensure your roof design can handle local weather conditions, especially if you expect a lot of snow.
By keeping these common chicken coop roof mistakes in mind and following these chicken coop roof tips, you can build a strong, functional roof. Avoiding these pitfalls will help you create a safe home for your chickens that lasts for years.
Maintenance Tips for a Long-Lasting Roof
Once your chicken coop roof is built, keeping it in good shape is important. Regular chickencoop roof maintenance will help ensure a long-lasting coop roof that protects your chickens. Here are some simple chicken coop roof upkeep tips to follow.
Regular Inspections
Inspect your roof at least twice a year. Look for cracks, leaks, or loose shingles. Early detection prevents bigger issues later. After storms or heavy weather, check for any new damage.
Clean the Roof
Debris like leaves and branches can trap moisture. Regularly clear off any buildup to help your roof breathe. This reduces the risk of leaks and helps maintain the roof’s lifespan.
Check for moss and algae.
Moss and algae can grow, especially in damp conditions. This growth traps moisture and damages your roofing material. Remove any growth gently using a soft brush or cleaner.
Inspect flashing and seals.
Flashing seals joints and edges on your roof. Check it often for wear or gaps. Replace or reseal any damaged areas quickly to prevent leaks.
Trim the overhanging branches.
Trees near your coop can be beautiful but risky. Cut back any branches that reach too close to your roof. This helps avoid breakage during storms and reduces debris.
Ensure proper ventilation.
Good ventilation is key for keeping moisture out. Check that vents are clear and functioning. Proper airflow prevents humidity and helps your roof last longer.
Address damage promptly.
If you find damage during inspections, fix it right away. Minor problems can swiftly escalate into major issues if ignored. Repair or replace any broken parts without delay.
Apply protective coatings.
Consider adding a protective coating or sealant to your roof. These coatings help prevent water damage and UV wear. Choose a product that works well with your roofing material.
By following these chicken coop roof maintenance tips, you can keep your roof in excellent shape. Regular care will lead to a long-lasting coop roof that keeps your chickens safe and dry. With a little effort, chicken coop roof upkeep can be simple and effective, giving you peace of mind for years to come.
Read More: How to Move Chicken Coop Safely: Step-by-Step Guide
Conclusion
Building a sturdy and safe chicken coop roof is a rewarding project. It not only protects your flock but also enhances your coop’s overall appeal. Remember, you have the tools and knowledge to tackle this project.
Take your time with each step. Don’t rush the process, and make sure to avoid common mistakes. A little patience can go a long way.
With a well-built roof, your chickens will thrive in a safe environment. Now that you know how to build a chicken coop roof, you’re ready to get started.
Read More: How Big Should a Chicken Coop Be? A Comprehensive Guide
FAQs
To build a chicken coop roof, you’ll need materials like shingles or metal sheets, wood for the frame, nails, and waterproofing supplies.
Use high-quality, durable materials. Also, seal all joints and seams well to keep your coop dry.
Common mistakes include mis measuring, using poor materials, and forgetting ventilation. Follow the guide to steer clear of these issues.
It’s best to check your roof every few months. Check for any damage and address problems immediately.
Absolutely! Just ensure the materials are sturdy, clean, and suitable for outdoor use to keep your chickens safe.